The Health Benefits of Trekking Poles

The Health Benefits of Trekking Poles

The Health Benefits of Trekking Poles

Introduction

Trekking poles are more than just fancy accessories for hiking enthusiasts. These versatile tools offer a range of benefits that enhance stability, reduce joint impact, provide a full-body workout, and improve overall hiking performance. 

In this blog post, we will delve into the advantages of using trekking poles, the individuals who can benefit from them, techniques for using them effectively, key features to consider when purchasing, and a few recommended trekking pole options.

The Benefits of Using Trekking Poles

Improved stability and balance

Trekking poles offer extra points of contact with the ground, boosting stability and reducing the risk of slips and falls, particularly on uneven or slippery terrain.

Reduced joint impact

By sharing the weight-bearing load, trekking poles alleviate stress on lower body joints like knees and ankles, making them an excellent choice for individuals with joint issues.

Increased upper body workout

Engaging the arms, shoulders, and core, trekking poles provide a balanced, full-body workout while hiking, distributing effort between the upper and lower body.

Enhanced endurance and reduced fatigue

By redistributing the effort required for hiking, trekking poles lessen fatigue and allow hikers to cover greater distances with less strain.

Improved posture and spinal alignment

Holding trekking poles promotes an upright posture and proper spinal alignment, reducing strain on the back and enhancing overall posture.

Increased caloric expenditure

Trekking poles elevate the overall muscular effort during hiking or walking, leading to higher calorie expenditure compared to walking without poles.

Who Would Benefit from Using Trekking Poles?

Individuals with joint issues

People with knee, hip, or ankle problems find relief as trekking poles minimize impact and stress on these joints.

Older adults and individuals with neurological conditions

Trekking poles provide older adults with increased balance, stability, and confidence while reducing the risk of falls. Those with neurological conditions like Parkinson’s disease can also benefit significantly.

Hikers and backpackers

Trekking poles are indispensable for hikers and backpackers of all skill levels, providing stability when carrying heavy loads or navigating challenging terrains.

Techniques for Using Trekking Poles

Adjusting the length

Set the poles to a length that allows your arms to form a comfortable 90-degree angle when holding the grips, with slightly bent elbows.

Grip and strap placement

Hold the grip firmly while allowing the strap to rest on the back of your hand, enabling a relaxed grip without the risk of dropping the pole.

Planting the poles

As you walk, plant the poles slightly ahead and to the side of your body in sync with your opposite leg, maintaining balance and stability.

Uphill and downhill techniques

Shorten the poles for uphill climbs, using them to push yourself upward. Lengthen the poles and plant them slightly behind your body when descending to provide support and reduce knee strain.

Features to Consider When Choosing Trekking Poles

Material

Look for lightweight and durable materials such as carbon fiber or aluminum, with carbon fiber being lighter but more expensive.

Weight

Opt for lighter poles to minimize fatigue during long hikes, considering the trade-off between weight and cost.

Length adjustability

Choose poles with adjustable lengths to adapt to various terrains and individual preferences.

Grip and comfort

Consider grip materials like cork, foam, or rubber, each offering different levels of comfort and sweat absorption.

Anti-shock features

Some poles have built-in shock absorbers to reduce joint impact, benefiting individuals with joint issues or those hiking on hard surfaces.

Price

Determine your budget and find poles that strike a balance between features and quality within that range.

Versatility

If you plan to engage in multiple outdoor activities, seek poles that can be adapted for hiking, snowshoeing, or Nordic walking.

Black Diamond Alpine

With a carbon shaft and cork grip, these poles are durable, have a comfortable grip, and are suitable for all seasons of hiking.

A slightly more expensive option but certainly a great product!

Click here for the Black Diamond Trekking Poles on Amazon!
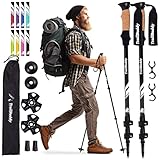
TrailBuddy Hiking

These poles offer good value for regular walking, hiking, or backpacking. The lightweight, collapsable hiking poles have over 55,000 reviews and 4.7 stars. 

The TrailBuddy Trekking poles are great for people on-the-go and looking to pack a lighter load.

Click here for the TrailBuddy Trekking Poles on Amazon!

Conclusion

Trekking poles are valuable tools for hikers and outdoor enthusiasts, offering stability, reduced joint impact, upper body engagement, and enhanced endurance.

By following proper techniques and considering key features when purchasing, you can maximize the benefits they provide. While the recommended models mentioned here are a starting point, it’s important to research and select the trekking poles that align with your specific needs, preferences, and budget.

So, grab your poles and embark on your next outdoor adventure with increased confidence, comfort, and performance!

Disclosure: as an amazon affiliate, I earn commissions from qualifying purchases made through the links provided on this website, which help support its maintenance and content creation.

About the Author

About the Author

Taylor Kuhlmann, PT, DPT, CSCS

Taylor Kuhlmann is a licensed physical therapist in Kansas, a certified strength and conditioning specialist accredited by the National Strength and Conditioning Association, and the founder of High Caliber Health. With a passion for guiding hunters and outdoor enthusiasts, Taylor focuses on enhancing their overall health and wellness, enabling them to experience the outdoors with reduced pain and enhanced performance.

11 Best Exercise Equipment for Shoulders

11 Best Exercise Equipment for Shoulders

11 Best Exercise Equipment for Shoulders

These 11 exercise equipment options for shoulder pain relief are affordable, user-friendly, and highly effective in reducing shoulder pain and improving overall function.  

As a physical therapist, strength and conditioning specialist, and avid hunter, I understand the importance of optimizing physical fitness to enhance hunting performance while minimizing pain and discomfort. 

In this blog post, we will explore the 11 best exercise equipment options for shoulder pain that can help you achieve your fitness goals, improve hunting performance, and ultimately enhance your overall hunting experience. 

Each of these 11 exercise equipment options for shoulder pain have been carefully selected to cater to the unique demands of hunting, ensuring that you are well-prepared for the challenges that lie ahead.

1.  Shoulder Pulley

The shoulder pulley system is an invaluable tool for improving range of motion and functionality in the shoulder joint. One effective technique to achieve this is by performing an active assisted range of motion exercises using the shoulder pulley, with assistance from the opposite extremity. This technique minimizes pain and discomfort while maximizing the benefits of the exercise.

By incorporating the shoulder pulley system into your training routine, you can specifically target movements crucial for hunting, such as reaching overhead when climbing a tree stand.

The pulley exercises allow you to simulate the exact motions involved in overhead reaching, helping to improve your range of motion and enhance your overall hunting performance.

2.  Shoulder Dowel Rod

The dowel rod is a versatile tool that can be used to perform active assisted exercises and shoulder stretches, effectively improving mobility in the shoulder joint. This is particularly beneficial for individuals experiencing limited range of motion due to conditions such as arthritis, frozen shoulder, or rotator cuff tendonitis.

By utilizing the dowel rod in various positions, such as supine (lying down), seated, or standing, you can target specific movements and stretches to enhance range of motion and overall function of the shoulder joint.

For active assisted exercises, the dowel rod can be held with both hands while performing movements that require external rotation, abduction, or flexion of the shoulder joint. This assists in overcoming any restrictions or discomfort, gradually increasing the range of motion. The dowel rod provides stability and control, allowing for safer and more effective exercises.

In addition to active assisted exercises, the dowel rod can be used for shoulder stretches. By holding the dowel rod with a wider grip, you can perform gentle stretching movements, such as internal and external rotation stretches or cross-body stretches. These stretches help lengthen and release tight muscles and tendons around the shoulder joint, promoting improved mobility and reducing discomfort.

Whether you are lying down, seated, or standing, incorporating the dowel rod into your shoulder mobility exercises and stretches can greatly benefit those with limited range of motion due to conditions like arthritis, frozen shoulder, or rotator cuff tendonitis. It provides support, assistance, and increased control, allowing you to gradually improve range of motion and overall function of the shoulder joint.

3.  Theraband

Therabands are highly useful for strengthening the shoulder and improving stability, making them an excellent tool for hunters. These elastic bands provide constant tension throughout the exercises, allowing for maximal engagement of the shoulder muscles and promoting strength and stability gains.

By incorporating therabands into your shoulder strengthening routine, you can target specific muscle groups involved in shoulder stability, such as the rotator cuff muscles. The resistance provided by the theraband challenges these muscles, helping to improve their strength and endurance. Stronger shoulder muscles contribute to better stability, reducing the risk of injuries and enhancing overall performance during hunting activities.

One of the advantages of therabands is their portability. They are lightweight, compact, and easily transportable, making them ideal for hunters who are always on the move. Therabands can be conveniently packed into a duffle bag, taking up minimal space and ensuring you can continue your shoulder-strengthening exercises while on hunting trips.

Moreover, therabands can be utilized during the hunts if needed. If you experience shoulder fatigue or weakness while in the field, a theraband can be quickly retrieved from your pack to perform some simple strengthening exercises. This on-the-go accessibility allows you to maintain and reinforce your shoulder stability even during hunting activities, reducing the risk of fatigue-related injuries and enhancing your performance in challenging situations.

To make the most of therabands for shoulder strengthening, it’s essential to consult with a physical therapist or strength and conditioning specialist. They can guide you in selecting the appropriate resistance level and exercises that target your specific needs and goals. Proper form and technique should also be emphasized to ensure optimal effectiveness and reduce the risk of injury.

4.  Dumbbells

Dumbbells are classic strength training tools that can help build overall body strength, stability, and coordination. Incorporating dumbbell shoulder exercises into your training regimen can improve your upper body strength, enhance your posture, and support proper body mechanics while aiming and shooting.

5.  Bodyblade

The Bodyblade is an exceptional and versatile tool that offers low-impact, oscillatory resistance training. This unique device is designed to challenge and improve multiple aspects of your physical fitness, including core stability, shoulder endurance, coordination, and shoulder stability.

When used regularly, the Bodyblade can have a significant impact on your hunting performance. By incorporating it into your training routine, you can enhance your ability to maintain a steady aim and effectively control recoil when firing your weapon. This, in turn, can greatly improve your shooting accuracy in the field.

The Bodyblade can be used with one or both arms, allowing you to target specific areas of weakness and reinforce the stability of the shoulder joint. With its ability to engage the muscles around the shoulder, the Bodyblade can be instrumental in reducing shoulder pain and promoting a return to normal activities with less discomfort.

To maximize the benefits of the Bodyblade, it is recommended to consult with a qualified physical therapist or strength and conditioning specialist. They can guide you in performing exercises with proper form and technique, ensuring optimal results while minimizing the risk of injury.

6.  Kettlebells

Kettlebells are excellent tools for developing total-body strength, power, and stability. The unique design of the kettlebell allows for a wide range of dynamic exercises that simulate the demands of hunting, such as squatting, lunging, and carrying heavy loads. Incorporating kettlebell swings, goblet squats, and farmer’s walks into your training routine can enhance your muscular endurance, explosiveness, and overall functional fitness.

Kettlebells are an effective tool for reducing shoulder pain and improving shoulder function. By incorporating kettlebell exercises into your workout routine, you can strengthen the muscles surrounding the shoulder joint, improve stability, and enhance overall shoulder mobility. The dynamic movements involved in kettlebell exercises engage multiple muscle groups simultaneously, promoting balanced muscle development and reducing imbalances that may contribute to shoulder pain. Additionally, kettlebell exercises promote proper movement patterns and alignment, which can help alleviate stress on the shoulder joint. With their versatility and ability to target specific muscle groups, kettlebells offer a comprehensive approach to reducing shoulder pain and improving overall shoulder health.

7.  The Axio Centripetal Trainer

The Axio Centripetal Trainer is a rotational training tool specifically designed to improve core strength, stability, and rotational power. By incorporating exercises with the Axio Centripetal Trainer into your training routine, you can enhance your ability to twist, turn, and maintain balance while maneuvering through uneven terrains during hunting expeditions.

Visit this site to check out the Axio Centripetal Trainer. 

8.  Weighted Exercise Balls

Weighted exercise balls are an excellent tool for performing upper body plyometric or dynamic strengthening exercises, specifically targeting the rotator cuff muscles. By incorporating these exercises into your workout routine, you can effectively enhance the strength and stability of the rotator cuff.

The weight of the exercise balls adds resistance, increasing the challenge and activating the muscles in a controlled and dynamic manner. These exercises promote explosive power, coordination, and stability, which are essential for shoulder health and function.

By engaging in upper body plyometric or dynamic strengthening exercises with weighted exercise balls, you can improve the strength, endurance, and overall performance of the rotator cuff muscles, ultimately reducing the risk of injuries and enhancing your shoulder’s stability and functionality.

9.  Arm Bike

Using an arm bike can provide several benefits for reducing shoulder pain and improving shoulder function. This versatile equipment allows for targeted exercises that help improve range of motion, shoulder strength, and overall muscular endurance.

By utilizing the arm bike regularly, you can engage the muscles around the shoulder joint in a controlled and low-impact manner, promoting flexibility and mobility. The resistance settings on the arm bike can be adjusted to gradually increase the challenge, allowing for progressive strength training. The repetitive motion of pedaling the arm bike also helps improve muscular endurance, which is essential for reducing fatigue and discomfort during daily activities and hunting pursuits.

Incorporating the arm bike into your exercise routine can aid in alleviating shoulder pain, enhancing shoulder stability, and improving overall shoulder function.

10.  Trigger Point Release Tool

A trigger point release tool offers numerous benefits in reducing muscle tightness and discomfort caused by trigger points. This specialized tool allows for targeted pressure application to specific trigger points, helping to alleviate muscle knots and tension.

By applying pressure to these trigger points, blood flow is increased, and muscle fibers are encouraged to relax, promoting pain relief and improved range of motion. The ease of use and portability of a trigger point release tool make it a convenient option for self-treatment.

Whether at home or on the go, this tool can be easily used to target areas of muscle tightness and provide relief. Incorporating a trigger point release tool into your routine can aid in reducing muscle tension, improving flexibility, and enhancing overall physical well-being.

11.  Foam Roller

A foam roller is a versatile tool that can offer significant benefits for shoulder and spinal mobility, reducing muscle tightness, and relieving shoulder pain. By using a foam roller, you can apply targeted pressure to the muscles around the shoulder and along the spine, promoting myofascial release and loosening tight knots. This helps improve flexibility, range of motion, and overall mobility in these areas.

Additionally, the foam roller aids in increasing blood flow and oxygenation to the muscles, facilitating the healing process and reducing inflammation. Regular use of a foam roller can effectively alleviate muscle tightness, reduce shoulder pain, and improve overall shoulder and spinal health. Incorporating foam rolling into your routine can be a valuable self-care practice for maintaining optimal shoulder function and enhancing overall well-being.

Conclusion:

By incorporating the exercise equipment for shoulder pain into your fitness routine, you can optimize your physical capabilities, reduce the risk of injury, and enhance your hunting performance. Remember to consult with a qualified physical therapist or strength and conditioning specialist to ensure proper form and technique while using these tools. With dedication and consistent training, you’ll be well-prepared to tackle any hunting challenge that comes your way.

Note: Please consult with your healthcare provider or a qualified professional before starting any new exercise program or using any of the mentioned tools.

Disclosure: as an amazon affiliate, I earn commissions from qualifying purchases made through the links provided on this website and blog posts, which help support its maintenance and content creation.

About the Author

About the Author

Taylor Kuhlmann, PT, DPT, CSCS

Taylor Kuhlmann is a licensed physical therapist in Kansas, a certified strength and conditioning specialist accredited by the National Strength and Conditioning Association, and the founder of High Caliber Health. With a passion for guiding hunters and outdoor enthusiasts, Taylor focuses on enhancing their overall health and wellness, enabling them to experience the outdoors with reduced pain and enhanced performance.

Read more here…

Achilles Tendonitis: Best Treatment to Fix Pain and Weakness

Achilles Tendonitis: Best Treatment to Fix Pain and Weakness

Achilles tendonitis is typically diagnosed when an individual experiences pain along the Achilles tendon. It’s important to note that inflammation may or may not be present with this condition. The underlying cause of Achilles tendonitis often lies in poor healing after small tears occur along the tendon, leading to stiffness and impaired mobility in the ankle and foot.

Can you feel a bulging disc with your hand?

Can you feel a bulging disc with your hand?

No, you cannot feel a bulging disc with your hand. The intervertebral discs are situated deep within the spine, positioned between adjacent vertebrae. Each disc is surrounded by layers of skin, fascia (connective tissue), muscles, and bony prominences of the spine (spinous processes). Even the most skilled hands cannot physically palpate deep enough to “feel” a bulging disc.

6 Best Hunting Boots for Achilles Tendonitis

6 Best Hunting Boots for Achilles Tendonitis

6 Best Hunting Boots for Achilles Tendonitis

Introduction

As a physical therapist and strength and conditioning specialist, I understand the importance of having the right gear to enhance your hunting experience. One of the most crucial investments for any hunter is a high-quality pair of hunting boots.

Various factors, including Achilles tendonitis, wet feet, and uncomfortable rubbing, can significantly impact your hunting adventures. That’s why choosing the right hunting boots is essential. In this blog post, we will delve into the world of hunting boots specifically designed to combat Achilles tendonitis. These boots provide unparalleled comfort and support, enabling you to traverse the terrain with ease while pursuing game.

Click here for treatment recommendations for Achilles Tendonitis!

Additionally, please note that this post contains affiliate links to Amazon. When you make qualifying purchases through these links, I earn commissions that help support the maintenance and content creation of this website.

Buying the Perfect Pair of Hunting Boots

Choosing the right hunting boots can be a daunting task given the multitude of options available. As a physical therapist, strength and conditioning specialist, and avid hunter, I understand the importance of making an informed decision before investing hundreds of dollars in a pair of boots.

Living in Kansas, I have personally experienced the unpredictable nature of hunting conditions. From hunting pheasants in deep snow to pursuing deer in unexpectedly warm temperatures, the weather can change dramatically during hunting seasons. Additionally, my hunting adventures span various game species and terrains, including deer, pheasant, quail, turkey, waterfowl, and coyotes, taking me through diverse landscapes in Kansas and even into the Rocky Mountains for elk season.

Considering the diverse range of hunting conditions I encounter, purchasing separate boots for each specific season is simply impractical, as this would cost over $1,000. Therefore, finding a versatile hunting boot that can handle various weather conditions and terrains has become my priority.

By investing in a high-quality, all-purpose hunting boot, I can ensure that my feet remain comfortable and protected throughout the year, regardless of the game or environment. These boots offer a combination of comfort, support, waterproofing, insulation, and durability to withstand the demands of multiple seasons and diverse hunting conditions.

What Do You Want in a Hunting Boot?

When shopping for hunting boots, it’s important to consider several key factors that can greatly enhance your hunting experience and protect your feet in various weather conditions.

Here are the qualities you should prioritize:

    • Comfort and Support: Look for hunting boots that offer excellent comfort and support. They should have ample cushioning, a supportive footbed, and a design that conforms to your feet for a comfortable fit. Good ankle support is crucial to reduce the risk of injuries, especially on uneven and rugged terrains.

    • Waterproofing: Hunting often involves traversing wet and muddy environments, so choosing boots with reliable waterproofing is essential. Look for boots made with waterproof materials and technologies that keep your feet dry and protected from moisture.

    • Insulation: Depending on the climate and hunting season, you’ll need boots with appropriate insulation to keep your feet warm in cold temperatures. Insulated boots provide thermal protection and prevent heat loss, ensuring your comfort during long hunts in chilly weather.

    • Durability: Hunting can be demanding on footwear, with rough terrains, sharp rocks, and dense vegetation. Invest in boots made from durable materials and with solid construction to withstand the rigors of hunting. Reinforced toe caps, abrasion-resistant materials, and sturdy outsoles are features to look for in durable boots.

    • Price Range: Quality hunting boots can be a significant investment, but it’s essential to strike a balance between quality and affordability. Aim for boots in the $200-300 price range, as they often offer a good combination of durability, performance, and value.

Factors for Alleviating Achilles Tendonitis

If you’re specifically looking for hunting boots to alleviate Achilles tendonitis, consider the following additional factors:

    • Ankle Support: Boots with higher shaft heights provide better ankle support, helping to stabilize the Achilles tendon and reduce strain during movement.

    • Cushioning and Shock Absorption: Look for boots that offer ample cushioning and shock absorption properties. These features help reduce the impact on the Achilles tendon and provide added comfort during long hunting trips.

    • Arch Support: Proper arch support is crucial for maintaining alignment and reducing strain on the Achilles tendon. Look for boots that offer adequate arch support to promote proper foot biomechanics.

    • Construction and Materials: Choose boots made with durable construction and high-quality materials. Look for features like waterproofing and breathability to ensure long-lasting comfort and protection.

    • Higher Heel: Boots with a slightly higher heel can help alleviate tension on the Achilles tendon and reduce associated pain. This feature promotes a more favorable position for the tendon and can provide relief during hunting activities.

By prioritizing these factors, you can make an informed decision and find hunting boots that not only support your Achilles tendon but also enhance your overall hunting experience.

Best Hunting Boots for Achilles Tendonitis

Now, let’s explore the top 6 hunting boots that will make your Achilles tendonitis feel like a distant memory. These boots are carefully designed to provide optimal support, cushioning, and stability:

1.  Danner Pronghorn

The Danner Pronghorn is a top contender with its innovative design and superior ankle support. These boots feature a cushioned midsole and rugged outsole for excellent traction. They are versatile and suitable for both upland and big game hunting.

The rubberized EVA midsole provides additional comfort and support, while the boots offer great arch support. Plus, they come with options for different amounts of insulation to meet your specific needs.

Pros: options for insulation, versatile for different types of hunting, durable construction, cushioned midsole, excellent ankle support

Cons: requires leather care and treatment to prolong the life of the leather

2.  Crispi Nevada

Buy once, cry once with the Crispi Nevada boots! Designed for rugged terrains, these boots offer exceptional ankle support and stability. The supportive midsole and breathable, waterproof membrane keep your feet dry and comfortable throughout your hunting adventures.

The Crispi Nevada is a legit shoe that delivers outstanding performance. Although they may come with a higher price tag, they are worth every penny. These boots are extremely durable and built to last.

They are ready to use right out of the box, providing immediate comfort. Made with high-quality Italian leather, they offer a luxurious feel. The ankle support is enhanced by the ankle bone support system (ABSS), ensuring stability and reducing the risk of Achilles tendonitis.

Pros: exceptional durability, comfortable, high-quality Italian leather, great ankle support with ABSS, ready to use out of the box 

Cons: expensive, available only in 200g insulation

3.  Irish Setter Vaprtrek

The Irish Setter VaprTrek is a hunting boot designed with comfort as a top priority. Its lightweight construction and excellent arch support make it a standout choice. These boots are equipped with a cushioned footbed and an aggressive outsole, providing superior traction in various terrains.


Pros: athletic fit, lightweight, comfortable, breathable material, affordable

Cons: tight-fitted, requires sufficient break-in before long hunts, questionable waterproofing

4.  Kenetrek Mountain Extreme

The Kenetrek Mountain Extreme is a renowned hunting boot admired for its durability and support. These boots feature a sturdy construction, a supportive shank, and generous cushioning, offering excellent relief for your Achilles tendon.

Pros: great waterproofing, durable, great warranty, great overall stability and ankle support

Cons: stiff, overkill for small game and upland hunting due to heavy-duty construction, expensive, heavy

5.  Irish Setter Elk Tracker

The Irish Setter Elk Tracker is a high-quality hunting boot that offers exceptional performance and durability. Made with 100% leather, these boots are designed to withstand the toughest hunting conditions. The waterproof GORE-TEX lining ensures your feet stay dry even in wet environments.

With 1000g 3M Thinsulate Ultra insulation, these boots provide superior warmth and comfort, making them ideal for colder climates. The Bulls-Eye Air Bob Aggressive sole offers excellent traction and stability on various terrains.

Additionally, the ScentBan technology incorporated in the boots helps eliminate odors that may give away your presence to game animals. Whether you’re trekking through rugged terrains or enduring extreme weather conditions, the Irish Setter Elk Tracker is a reliable and versatile choice for hunters seeking top-notch performance.

Pros: durable, has a removable memory foam footbed for comfort, great traction, multiple options for insulation, warm and waterproof, great ankle support

Cons: Heavy, leather may require upkeep

6.  Danner Vital

The Danner Vital is a reliable choice that offers a blend of durability and functionality, making it an excellent option for hunters dealing with Achilles tendonitis. These boots prioritize your comfort and foot health, featuring a cushioned footbed, waterproof lining, and a supportive midsole to ensure your Achilles tendon remains pain-free and protected.

Personal experience: During my last elk hunt in Colorado’s GMU 82, I relied on the Danner Vital boots. The rugged terrain in this unit can be challenging, but these boots performed exceptionally well. I experienced great comfort throughout the entire hunt, thanks to their well-designed features. The 800 gram insulation provided ample warmth in the cool temperatures, allowing me to stay on my feet for the entire 5-day hunt. I highly recommend these boots not only for their performance but also for their outstanding comfort and warmth. 

Consider opting for a version of the Danner Vital with less insulation if you tend to experience sweaty feet during physical activity. This can help prevent excessive moisture buildup and improve overall comfort during your hunting adventures. The Danner Vital is available in different insulation options, allowing you to choose the one that best suits your needs and preferences.

Pros: affordable, versatile, lightweight, and comfortable

Cons: questionable waterproofing

Are Insulated Hunting Boots Necessary?

Insulated hunting boots can be necessary depending on the specific hunting conditions and the climate you’ll be hunting in. 

Here are a few factors to consider:

1.  Cold Weather: If you’re hunting in cold weather or winter conditions, insulated boots can provide essential warmth and help prevent your feet from getting cold or frostbite. Insulation materials like Thinsulate™ or other synthetic or natural fibers trap body heat and keep your feet warm.

2.  Extreme Temperatures: If you’re hunting in extremely cold temperatures, such as in the Arctic or during late-season hunts, insulated boots are highly recommended. They offer additional protection against frigid temperatures and maintain warmth even when you’re stationary for extended periods.

3.  Early Morning and Late Evening Hunts: During the early morning or late evening hours, temperatures can be cooler, especially in transitional seasons like fall or spring. Insulated boots can keep your feet comfortable and prevent discomfort caused by cold temperatures during these times.

4.  Stand Hunting or Still Hunting: If you engage in stand hunting or still hunting where you spend extended periods of time in one location, insulated boots are beneficial. They provide insulation against the cold ground and help maintain warmth when you’re not moving much.

5.  Hunting in Wet Conditions: Insulated boots often come with waterproof or water-resistant features. If you’re hunting in wet or damp environments, such as marshes or swamps, insulated boots can keep your feet dry and warm.

However, it’s worth noting that insulated boots may not be necessary for every hunting situation. If you hunt in warmer climates or engage in active pursuits where your body generates enough heat to keep your feet warm, you might opt for non-insulated boots for better breathability and comfort.

Ultimately, the decision to wear insulated hunting boots depends on your specific hunting conditions, the weather, and your personal comfort preferences. It’s essential to assess your needs and choose the appropriate footwear accordingly.

Conclusion:

With the right selection of hunting boots and proper care, Achilles tendonitis doesn’t have to hinder your hunting adventures. Prioritize boots that offer the necessary support, cushioning, and stability to alleviate strain on the Achilles tendon.

Remember, if you continue to experience persistent pain or discomfort, it’s essential to seek professional advice from a physical therapist or healthcare provider. Don’t let Achilles tendonitis hold you back from pursuing your passion for hunting. Equip yourself with the right gear, take care of your body, and venture into the wild with confidence.

About the Author

About the Author

Taylor Kuhlmann, PT, DPT, CSCS

Taylor Kuhlmann is a licensed physical therapist in Kansas, a certified strength and conditioning specialist accredited by the National Strength and Conditioning Association, and the founder of High Caliber Health. With a passion for guiding hunters and outdoor enthusiasts, Taylor focuses on enhancing their overall health and wellness, enabling them to experience the outdoors with reduced pain and enhanced performance.

Why Does My Neck Hurt After Archery?

Why Does My Neck Hurt After Archery?

Discover the cause of neck pain after archery to enhance your bow-drawing experience. Uncover insights and solutions in this blog post, ensuring you can pursue your passion with reduced discomfort and improved shooting accuracy.

read more
Archer’s Elbow: Tips for Managing Lateral Epicondylitis

Archer’s Elbow: Tips for Managing Lateral Epicondylitis

Archer’s elbow can make it difficult to draw and shoot a bow. In this article, I’ll highlight effective tips for managing and alleviating elbow pain (lateral epicondylitis) in bowhunters. Learn about the causes, symptoms, treatments, and smart modifications to enjoy your outdoor pursuits without interruption.

read more
What Do Hunters Need the Most? A Hunter’s List

What Do Hunters Need the Most? A Hunter’s List

Explore our guide for the ideal gifts for deer hunters. From warmth and safety to budget-friendly options, we’ve got it all. Support us by using the affiliate links for your purchase, and ensure your deer hunter is ready for a successful, comfortable hunt in the great outdoors.

read more

Achilles Tendonitis: Best Treatment to Fix Pain and Weakness

Achilles Tendonitis: Best Treatment to Fix Pain and Weakness

Achilles Tendonitis: Best Treatment to Fix Pain and Weakness

Introduction:

The Achilles tendon plays a crucial role in our ability to move, allowing us to propel ourselves forward when walking or running. Unfortunately, Achilles tendonitis is a common condition that can cause pain along this vital tendon. In this article, we will explore the causes of Achilles tendonitis, common symptoms,  its impact on hunters, and most importantly, effective strategies for preventing it.

Understanding Achilles Tendonitis:

Achilles tendonitis is typically diagnosed when an individual experiences pain along the Achilles tendon. It’s important to note that inflammation may or may not be present with this condition. The underlying cause of Achilles tendonitis often lies in poor healing after small tears occur along the tendon, leading to stiffness and impaired mobility in the ankle and foot.

How do you know if you have bad ankle mobility?

Limited ankle mobility is a common issue that contributes to conditions like Achilles tendonitis. By recognizing the signs of ankle mobility issues and conducting self-assessments, hunters can identify potential risks. A useful self-assessment technique is the “knee-to-wall” test. Kneel in front of a wall, place your foot about a hand-width away, and lean forward, attempting to touch your knee to the wall while keeping your heel on the floor. By measuring the distance and assessing tightness, you can gauge your ankle mobility.

No pain or a hand-width distance between the foot and wall is considered a normal test.

How to Improve Ankle Mobility:

The knee-to-wall test itself serves as an ankle mobility exercise. However, if you experience ankle mobility issues or tightness, targeted ankle mobility and strengthening exercises can help improve the situation. Pinching in the anterior ankle may indicate a restriction within the ankle joint and can be addressed by frequently performing the knee-to-wall test. Calf muscle tightness or tightness along the Achilles tendon may improve with stretching and strengthening exercises.

At the end of this post, we will explore exercises to address ankle mobility concerns.

Symptoms of Achilles Tendonitis Ankle:

Recognizing the symptoms of Achilles tendonitis is crucial for early intervention and effective treatment. Common symptoms include:

1.  Calf and Ankle Tightness:

One of the initial signs of Achilles tendonitis is a feeling of tightness along the Achilles tendon and calf muscles. This tightness often leads to stiffness and restricted mobility when attempting to move the foot and ankle, particularly when pulling the foot and toes up. This movement puts strain on the muscle and Achilles tendon, exacerbating the discomfort.

2.  Heel Pain while Walking or Running:

A distinct symptom of Achilles tendonitis is pain in the backside of the heel, particularly when weight is placed on the toes during walking or running. This pain is often significant enough to cause individuals to develop a limp to alleviate pressure on the affected area.

3.  Visible Nodule or Lump in the Achilles Tendon:

In moderate-to-severe cases of Achilles tendonitis, a physical and palpable nodule may be noticeable along the Achilles tendon. This nodule is a visible manifestation of the inflammation and can contribute to the discomfort experienced.

4.  Sharp, Radiating Pain in the Calf or Heel:

Localized pain at the point where the Achilles tendon inserts into the heel bone or in the middle portion of the tendon itself. 

5.  Pain when Walking on Tip-Toes:

Contracting the calf muscle and putting stress on the inflamed area can elicit pain in individuals with Achilles tendonitis. Walking on tip-toes, which engages the calf muscle, can exacerbate the discomfort and further highlight the presence of this condition.

The Impact on Hunters:

Hunters, who regularly participate in activities like hiking across uneven terains, face an increased vulnerability to achilles tendonitis. This condition often manifests with symptoms after engaging in pursuits such as elk hunting in mountainous regionds or upland hunting. In order to minimize the risk, hunters should prioritize physical preparation to decrease the liklihood of developing this painful ailment

The varied terrains encountered during activities like hiking, elk hunting in the moutnains, or upland hunting can exert added pressure on the Achilles tendon. The repetitive motions involved in these pursuits, such as climbing, descending, or traversing challenging surfaces, can result in overuse and strain on the tendon.

The Importance of Preparation:

Many hunters who experience Achilles tendonitis share a common factor: a lack of preparation before their hunting trips. Physical preparation is key to reducing the risk. Hunters should engage in regular physical activity, maintaining strength and flexibility in their calf muscles through exercises like calf raises and eccentric heel drops. Incorporating a variety of activities like hiking, running, and strength training will provide a comprehensive approach to fitness and injury prevention.

Taking Prompt Action:

If you experience any signs and symptoms of Achilles tendonitis, it is crucial to take prompt action to prevent the condition from becoming chronic. One of the first steps you should take is to rest the affected area. Avoid activities that aggravate the symptoms and allow your Achilles tendon time to heal. Additionally, applying ice to the area can provide initial relief by reducing pain and swelling. Use an ice pack or wrap ice in a towel and apply it to the Achilles tendon for approximately 15-20 minutes at a time.

Remember to always seek professional advice from a physical therapist or healthcare provider who can provide a comprehensive treatment plan tailored to your specific needs. They will guide you through the appropriate steps to manage and recover from Achilles tendonitis effectively.

Remaining active by performing pain-free activities is critical. Total rest, inactivity, is not recommended. 

PT Exercises for Achilles Tendonitis 

Jill Cook, a renowned expert in the field of tendinopathy, emphasizes a progressive loading program as her recommended approach for Achilles tendonitis. As a physical therapist who has worked with numerous clients and patients, I have developed an exercise program based on this principle. It’s important to note that while this program generally works well for patients with Achilles tendonitis, modifications to exercises and parameters may be necessary based on each individual’s symptoms.

Research has shown that exercise is the most supported treatment option for Achilles tendonitis. When performing exercises, it is crucial to manage pain levels. Ideally, the pain should remain at a 4-5 out of 10 or lower and should not worsen the following day. It is actually a positive sign if the pain improves or lessens after the first set or two of the isometric exercises.

If the pain and soreness become more severe the following day, it indicates that there may have been excessive stress or load on the tendon. In such cases, I recommend regressing the exercises by adjusting the sets, repetitions, or load. Once the pain subsides, I gradually progress the sets, repetitions, and load while always monitoring pain levels and the following day’s soreness.

Below is an Achilles Tendonitis protocol that I follow with many clients and patients who experience pain along the Achilles tendon.

Phase Exercise Description Repetitions/Sets Frequency
Phase 1: Isometric Exercises (Weeks 1-2) Isometric Calf Raises Stand near a wall or a stable surface for support. Push both feet into the ground, rise up onto your toes, and hold the position for 45 seconds. 5 sets 3-5 times daily
Eccentric Heel Drops Stand on a step with your heels hanging off the edge. Rise up onto your toes using your uninjured leg, then transfer your weight to your injured leg and slowly lower your heel below the step. 8-12 repetitions 3-5 times daily
*By the end of week two, pain should be substantially better. One should be able to progress their activity level with normal activities of daily living, as well as in the gym.
Phase 2: Heavy Slow Resistance Training (Weeks 3-6) Calf Raises Stand on both feet near a wall or a stable surface for support. Rise up onto your toes using both legs, then slowly lower your heels below the step. 3 sets of 12-15 repetitions Twice a day
Eccentric Heel Drops Stand on a step with your heels hanging off the edge. Rise up onto your toes using both legs, then transfer your weight to your injured leg and slowly lower your heel below the step. 3 sets of 12-15 repetitions Twice a day
Phase 3: Plyometric Exercises (Weeks 7-10) Double-Legged Calf Jumps Stand on both feet with your knees slightly bent. Jump off the ground using both feet, propelling yourself upwards. Land softly and repeat. 3 sets of 10 jumps Twice a day
Single-Legged Calf Jumps Stand on your injured leg with your knee slightly bent. Jump off the ground using your injured leg, propelling yourself upwards. Land softly and repeat. 3 sets of 10 jumps Twice a day
Phase 4: Sport-Specific Exercises (Weeks 11+) Sport-Specific Drills Gradually incorporate activities related to your specific sport or activity that caused the Achilles tendonitis. Start with low-intensity drills and gradually increase the intensity and complexity over time. 3 times a week

General Guidelines:

    • Perform these exercises 4-5 days a week, allowing for adequate rest and recovery on the remaining days.
    • Monitor your pain levels during and after each session. Mild discomfort is acceptable, but avoid exacerbating pain.
    • Focus on maintaining proper form and technique throughout each exercise.
    • Progress gradually by increasing the number of repetitions, sets, or intensity level as tolerated.

Remember, this is a general exercise program based on Jill Cook’s recommendations. To ensure your safety and optimize your recovery, it is important to work with a qualified healthcare professional or physical therapist who can assess your specific condition and provide personalized guidance and adjustments.

Additionally, do not neglect the other muscles of your legs. There are numerous exercises that can benefit the entire leg while putting minimal stress on the calf and Achilles tendon. A comprehensive physical therapy or strengthening program should incorporate exercises for the entire leg and core to build a solid foundation and enhance the recovery process.

Exercises to Improve Ankle Mobility:

1.  Half Kneeling Ankle Dorsiflexion with Mobilization:

Assume a half-kneeling position with one knee on the ground and the other foot positioned in front of you, flat on the floor. Keep your heel on the ground and gently lean your body weight forward, focusing on bringing your knee towards your toes. This exercise targets ankle dorsiflexion, which brings the top of your foot towards your shin and improves mobility in that direction.

2.  Kneeling Ankle Plantarflexion Stretch:

Start by kneeling on the floor with your toes tucked under and the tops of your feet flat on the ground. Slowly sit back onto your heels, feeling the stretch in your ankles and the front of your feet. Hold this position for 20-30 seconds and then release. This stretch focuses on ankle plantarflexion, which is the movement that points your toes downward and helps increase flexibility in that direction.

3.  Ankle 4-Way Movement:

This exercise involves moving your ankle in different directions to enhance its range of motion. Perform the following movements:

      • Dorsiflexion: Lift your toes towards your shin, aiming to bring your foot towards a 90-degree angle.
      • Plantarflexion: Point your toes away from your shin, trying to achieve a full downward pointing of the foot.
      • Inversion: Turn your foot inward, towards the midline of your body.
      • Eversion: Turn your foot outward, away from the midline of your body.

Perform 10-15 repetitions, 2-3 sets each, in each direction while focusing on smooth and controlled movements. A resistance band may be used to progress the load and elicit further strength and mobility improvements.

Conclusion:

As a physical therapist, strength and conditioning specialist, and avid hunter, I understand the challenges that hunters face when it comes to Achilles tendonitis. By prioritizing physical preparation, maintaining an active lifestyle, and promptly addressing any symptoms, hunters can significantly reduce the risk of developing this condition.

The provided exercise program, based on the recommendations of renowned expert Jill Cook, focuses on progressive loading and includes isometric exercises, heavy slow resistance training, plyometric exercises, and sport-specific drills. Additionally, improving ankle mobility through exercises like half kneeling ankle dorsiflexion with mobilization and ankle 4-way movement can further reduce the risk of Achilles tendonitis.

Remember, prevention is key. Stay active, eat well, and enjoy your hunting adventures pain-free. If you experience any symptoms or concerns, consult with a qualified healthcare professional or physical therapist for personalized guidance and treatment.

About the Author

About the Author

Taylor Kuhlmann, PT, DPT, CSCS

Taylor Kuhlmann is a licensed physical therapist in Kansas, a certified strength and conditioning specialist accredited by the National Strength and Conditioning Association, and the founder of High Caliber Health. With a passion for guiding hunters and outdoor enthusiasts, Taylor focuses on enhancing their overall health and wellness, enabling them to experience the outdoors with reduced pain and enhanced performance.

Can you feel a bulging disc with your hand?

Can you feel a bulging disc with your hand?

Can you feel a bulging disc with your hand?

No, you cannot feel a bulging disc with your hand. The intervertebral discs are situated deep within the spine, positioned between adjacent vertebrae. Each disc is surrounded by layers of skin, fascia (connective tissue), muscles, and bony prominences of the spine (spinous processes). Even the most skilled hands cannot physically palpate deep enough to “feel” a bulging disc.

Does a bulging disc hurt when you press on it? 

Although you can’t physically feel a bulging disc, there are indicators that can suggest its presence. Irritation caused by a bulging disc can lead to heightened sensitivity in the surrounding nerves. Consequently, you may experience pinpoint tenderness in the affected area, typically near the location of the bulging disc. This tenderness may be present along the spine and surrounding musculature. In some cases, it can also cause referred pain into the buttocks and result in symptoms such as sciatica, characterized by radiating pain into the thigh, hamstring, calf, or foot.

What are symptoms of a bulging disc?

A bulging disc can cause a range of symptoms depending on its location and the extent of compression or irritation it places on nearby structures. Here are common symptoms associated with a bulging disc:

 1. Back or Neck Pain

You may experience localized pain in the area of the bulging disc. In the case of a bulging disc in the cervical (neck) spine, this pain can radiate to the shoulders and arms. For a bulging disc in the lumbar (lower back) spine, the pain can radiate to the buttocks and legs.

2. Numbness and Tingling

Compression of nerves by a bulging disc can lead to numbness, tingling, or a “pins and needles” sensation. These sensations may occur in the affected area, such as the neck, shoulders, arms, buttocks, or legs.

3. Muscle Weakness

A bulging disc can impinge on nerves responsible for muscle control, leading to weakness or difficulty with certain movements. This weakness may affect specific muscles or muscle groups associated with the affected nerve pathway.

4. Radiating Pain

In some cases, a bulging disc can cause radiating pain known as radicular pain. This pain follows the path of the compressed nerve, resulting in shooting or sharp sensations that travel from the spine to other areas of the body. For example, a bulging disc in the lumbar spine can cause sciatica, characterized by radiating pain down the buttocks, thigh, calf, or foot.

5. Changes in Sensation

Along with numbness and tingling, you may experience altered sensation in the affected areas. This can include hypersensitivity, a feeling of heaviness, or a loss of sensation.

6. Limited Range of Motion

A bulging disc can restrict the normal movement of the spine, leading to stiffness and a reduced range of motion. This limitation may affect activities such as bending, twisting, or lifting.

Do I have a bulging disc?

Maybe. Maybe not. It might not matter.

It’s important to note that the severity and combination of symptoms can vary widely from person to person. Additionally, not all individuals with a bulging disc will experience symptoms, as some cases may remain asymptomatic.

A very high level research study that I refer many patients to is a study that highlights the prevalence of asymptomatic individuals with a confirmed bulging disc via MRI. In other words, there are individuals who have bulging discs in their spines but do not report any symptoms or discomfort in their backs. This suggests that the presence of a bulging disc alone may not be the sole cause of back pain, and other factors or mechanisms may contribute to the development of symptoms. It highlights the complexity of the relationship between spinal abnormalities and the experience of pain, emphasizing the need for a comprehensive assessment and consideration of various factors when evaluating and treating back pain.

MRI Findings of Disc Degeneration

How can I test myself for a herniated disc?

As a physical therapist and strength and conditioning specialist, I often encounter individuals seeking ways to self-assess the possibility of a herniated disc. While self-diagnosis should not replace a professional evaluation, understanding certain tests can provide valuable insights. 

The Slump Test is a diagnostic examination that helps assess the integrity of the nerves and discs in the lower back and legs.

It is typically performed while seated on the edge of a chair or table, following these steps:

      1. Sit upright with good posture, and ensure your feet are flat on the ground.
      2. Begin by gently slumping your shoulders forward, rounding your back.
      3. While maintaining the slumped position, slowly extend one leg at a time, raising it off the ground.
      4. As you extend your leg, simultaneously flex your neck, bending it forward, and tuck your chin towards your chest.
      5. Finally, try to straighten your knee completely while keeping your foot dorsiflexed (toes pointing towards you).


During the Slump Test, a positive result may indicate the presence of nerve irritation or compression, potentially caused by a herniated disc. Here are the key signs that suggest a positive Slump Test:

      • Reproduction of Pain: You may experience a sharp or shooting pain, tingling, or numbness in your lower back, buttocks, thigh, calf, or foot. This discomfort may travel along the path of the affected nerve.
      • Increased Symptoms with Neck Flexion: When you flex your neck forward and tuck your chin, it can exacerbate the pain, tingling, or numbness in your lower back, buttocks, or legs.
      • Sensation Changes: You may notice altered sensation, such as pins and needles, tingling, or numbness in specific areas along the affected nerve pathway.

Remember, self-diagnosis and self-treatment are not recommended. If you suspect a herniated disc or are experiencing persistent pain, tingling, or numbness in your back, buttocks, or legs, consult with a healthcare professional for a comprehensive evaluation and personalized care.

Signs bulging disc is getting worse?

Signs that a bulging disc is getting worse can vary depending on the specific circumstances and location of the disc. However, there are several key indicators that may suggest a worsening condition. It’s important to note that these signs should be evaluated by a healthcare professional for an accurate diagnosis and appropriate management. Let’s explore some of these signs:

Peripheralization vs Centralization

Peripheralization and centralization refer to the pattern of symptoms and their location in relation to the spine. Peripheralization occurs when the pain or other symptoms extend further down the arm or leg, away from the spine. This may indicate worsening nerve compression or irritation. On the other hand, centralization occurs when symptoms begin to move closer to the spine, which can be a positive sign indicating the body’s response to treatment.

Bowel and Bladder Changes

In more severe cases, a bulging disc can compress the nerves that control bowel and bladder function. If you notice sudden changes in your ability to control urination or bowel movements, such as difficulty initiating or stopping, loss of bladder or bowel control, or changes in bowel habits, it is crucial to seek immediate medical attention as it may indicate a serious condition known as cauda equina syndrome.

Saddle Anesthesia

Saddle anesthesia refers to a loss of sensation in the areas that would come into contact with a saddle, such as the inner thighs, buttocks, and perineal region. It can be a concerning symptom associated with nerve compression in the lower spinal region. If you experience saddle anesthesia, it is important to consult a healthcare professional promptly.

Leg Instability

Worsening symptoms from a bulging disc can lead to weakness or instability in the legs. You may notice difficulty with balance, coordination, or changes in your ability to walk or perform daily activities. This can be a result of nerve compression affecting the motor function of the leg muscles. Any new or significant changes in leg strength or stability should be assessed by a healthcare professional.

If you experience any of these signs or have concerns about a bulging disc, it is crucial to consult with a healthcare professional, such as a spine specialist or physical therapist. They can conduct a thorough evaluation, provide an accurate diagnosis, and recommend appropriate treatment options to address the worsening symptoms and prevent further complications. Early intervention and proper management are essential for optimizing outcomes and promoting recovery.

About the Author

About the Author

Taylor Kuhlmann, PT, DPT, CSCS

Taylor Kuhlmann is a licensed physical therapist in Kansas, a certified strength and conditioning specialist accredited by the National Strength and Conditioning Association, and the founder of High Caliber Health. With a passion for guiding hunters and outdoor enthusiasts, Taylor focuses on enhancing their overall health and wellness, enabling them to experience the outdoors with reduced pain and enhanced performance.

Shotgun Recoil: Shoulder Pain After Shooting

Shotgun Recoil: Shoulder Pain After Shooting

Shotgun Recoil: Shoulder Pain After Shooting

Introduction

While the thrill of shooting a shotgun is undeniable, the forceful kickback can sometimes lead to discomfort or even pain in your shoulder. I want to discuss what seems to be a rather popular topic related to shooting shotguns: shoulder pain caused by recoil.

Shooting a few rounds may not cause much soreness, but an entire afternoon spent with friends engaging in skeet shooting or dove hunting can leave you waking up the next morning with some aching in the anterior shoulder. Personally, I think that’s a sign of a damned good time! 

Nonetheless, I’m here to provide valuable information and useful tips on how to effectively manage and alleviate shoulder pain caused by shotgun recoil. By understanding the underlying causes and implementing a few simple strategies, you’ll be able to enjoy your shooting adventures with increased comfort and ease. Let’s highlight the ways to keep your shoulders happy and pain-free after firing a shotgun!

What is shotgun recoil?

*Always practice gun safety*

Shotgun recoil refers to the backward force generated when shooting a shotgun. When you pull the trigger, the gunpowder inside the shotgun shell ignites, creating a powerful explosion that propels the pellets or slug out of the barrel. This explosive force pushes the shotgun backward, and as a result, an equal and opposite force, known as recoil, is transferred through the gun and into your shoulder. In simple terms, recoil is the kickback you feel when you shoot a shotgun, which can sometimes be quite strong. Understanding and managing this recoil is important to ensure a comfortable and enjoyable shooting experience.

How bad is shotgun recoil?

The severity of shotgun recoil can vary depending on several factors. Firstly, it depends on the specific shotgun gauge and load you’re using. Generally, shotguns with larger gauges, such as 12 gauge, produce more recoil compared to smaller gauges like 20-gauge or .410 bore. 

Additionally, the type of ammunition, such as the shot size and powder load, can influence the recoil. Furthermore, the design and weight of the shotgun itself play a role. Shotguns with heavier barrels and stocks tend to absorb more recoil, making them more comfortable to shoot. I’ve personally noticed a substantial difference in kick between my 20-gauge youth model Remington and my 1187 Remington. The 0-guage is much lighter and provides a substantial kick, while the 12-guage is heavier and absorbs some of the force, making the kick less intense. Thus, the weight and size of the firearm undoubtedly make a notable impact.

Lastly, individual factors like body size, strength, and shooting technique can also affect how one perceives shotgun recoil. While some recoil is inevitable, it’s essential to manage it properly to prevent discomfort or potential injuries.

Recoil bruise

Recoil bruise, also known as a recoil injury or shotgun bruise, is a common consequence of experiencing excessive shotgun recoil. When the force of the recoil is intense or improperly absorbed, it can cause bruising on the shoulder. A recoil bruise typically appears as a discolored area on the skin, ranging from light discoloration to dark purple or blue hues. The bruise occurs due to the blood vessels near the skin’s surface being damaged or broken by the sudden impact. 

Recoil bruises can be painful and tender to the touch. It is essential to take measures to prevent recoil bruising by using proper shooting techniques, ensuring a well-fitted shotgun, and employing recoil-absorbing accessories like recoil pads. If a bruise does occur, it will generally heal on its own within a week or two, but it’s advisable to consult a healthcare professional if there are concerns about the severity of the bruise or if it doesn’t improve over time.

The recoil pads below can be helpful at reducing shoulder pain after shooting. 

Treating a recoil bruise

When it comes to treating a recoil bruise, there are a few simple steps you can follow to promote healing and alleviate discomfort. Firstly, it’s important to apply a cold compress or ice pack to the affected area as soon as possible. This helps reduce swelling and numb the area, providing pain relief. Be sure to wrap the ice pack in a thin cloth to avoid direct contact with the skin. Applying the cold compress for 15-20 minutes at a time, several times a day, can be beneficial. 

Additionally, over-the-counter pain relievers like acetaminophen or ibuprofen can help alleviate pain and reduce inflammation. Resting the bruised area and avoiding activities that may exacerbate the pain is recommended. It’s crucial to allow the bruise to heal naturally, so avoid applying heat or massaging the area too vigorously, as this can worsen the bruising. If the bruise appears severe, causes intense pain, or shows signs of infection (such as increased redness, warmth, or discharge), it’s advisable to seek medical attention to ensure proper evaluation and care.

This ice pack is a great option to help with a sore shoulder after shooting a shotgun, or alleviating pain from every day use. It’s large enough to cover some of the pectoral and rotator cuff muscles, as well!

Shotgun recoil hitting cheek

When shooting a shotgun, the recoil force generated can sometimes cause the gun to hit your cheek, resulting in discomfort or even injury. This can happen when the gun is not properly shouldered or if the shooter’s stance or grip is incorrect. The impact of the gun hitting your cheek can be painful and may even leave a mark or bruise. To prevent this, it is crucial to ensure a proper shooting technique. This includes firmly shouldering the shotgun, positioning your cheek comfortably on the stock, and maintaining a stable and balanced stance.

Additionally, using a shotgun with appropriate stock dimensions and fit for your body can also help minimize the likelihood of the gun hitting your cheek. Remember, safety should always be a priority when handling firearms, so pay close attention to your shooting form and take necessary precautions to prevent any unnecessary discomfort or injury.

Labrum injuries from shooting

Labrum injuries can occur after shooting due to the repetitive and forceful movements involved in shotgun shooting. The recoil from shooting a shotgun can put significant stress on the shoulder, potentially causing the labrum to tear or become damaged.

Labrum injuries can result in symptoms such as shoulder pain, a feeling of instability or popping in the joint, decreased range of motion, and difficulty with certain movements.

Labrum

The labrum is a ring of cartilage that surrounds the shoulder socket, providing stability and support to the joint.

If you experience these symptoms after shooting, it is important to seek medical evaluation and diagnosis. Treatment for labrum injuries may include rest, physical therapy exercises to strengthen the shoulder muscles, and in severe cases, surgical repair.

It’s crucial to take measures to prevent labrum injuries by using proper shooting techniques, maintaining good shoulder strength and stability, and ensuring that your shotgun fits you well. 

With appropriate caution and proper shooting form, a labrum injury is not commonly caused by the actual shooting itself. If this happens, it’s likely the individual had an underlying labral tear that became aggravated by the repetitive recoil and stress to the shoulder.

Can a shotgun dislocate your shoulder?

While it is possible for a shotgun’s recoil to cause shoulder injuries, such as bruising or strains, dislocating your shoulder solely from shooting a shotgun is highly unlikely. Shotgun recoil typically generates a backward force that is absorbed by the shoulder joint and the surrounding muscles and tendons. 

Dislocating a shoulder usually requires a significant force or trauma, such as a fall or a sudden impact. However, it’s important to note that if you already have a pre-existing shoulder instability or a history of shoulder dislocation, the recoil from shooting a shotgun could potentially exacerbate the condition or increase the risk of a dislocation. 

If you have any concerns about the health and stability of your shoulder, it’s always a good idea to consult with a licensed physical therapist who can guide you in a strengthening program to improve the stability of the shoulder joint.

Shoulder muscles stabilizing the shoulder joint while shooting a shotgun.

The shoulder muscles play a crucial role in stabilizing the shoulder joint while shooting a shotgun. When you fire a shotgun, the recoil force generated travels through the gun and into your shoulder. This force can be quite powerful and potentially destabilizing if not properly controlled.

The shoulder muscles, including the deltoids, rotator cuff muscles, and the muscles of the upper back and chest, work together to provide stability and support to the shoulder joint during the recoil. 

By engaging and strengthening these muscles, you can better absorb and distribute the recoil force, reducing the impact on the shoulder joint and minimizing the risk of injury. Additionally, having strong and stable shoulder muscles helps maintain proper shooting form and accuracy, as it allows for better control of the shotgun. Therefore, it is vital to prioritize shoulder muscle strength and stability through regular exercise and conditioning, enabling you to enjoy a more comfortable and controlled shooting experience.

Where do you shoulder a gun?

Proper shouldering position is crucial when shooting a shotgun to ensure stability, control, and minimize the risk of injuries. To achieve the correct shouldering position, start by placing the buttstock firmly against the pocket of your shoulder, where the shoulder meets the chest. The stock should rest snugly in this pocket, allowing for a solid connection between your body and the shotgun. Position your head in alignment with the shotgun’s barrel, with your cheek lightly touching the stock. This position, known as the “cheek weld,” helps provide a consistent sight picture and improves accuracy. Maintain a relaxed but firm grip on the forearm of the shotgun, allowing for controlled movement and absorption of recoil. 

Where to shoulder a gun

Green photo: great cheek contact and positioning of the butt of the gun on the pocket of the shoulder.

Red photo: incorrect placement of the butt of the gun on the deltoid/biceps area. This CAN be painful.

Where NOT to shoulder a gun

Keeping the shotgun shouldered properly throughout the shooting process helps maintain balance and control, allowing you to shoot with greater accuracy and comfort. Regular practice and proper shouldering technique can contribute to a more enjoyable and successful shooting experience.

When can you shoot after shoulder surgery?

The timing of when you can resume shooting after shoulder surgery depends on several factors, including the type and extent of the surgery, as well as the recommendations of your surgeon and physical therapist.

Each person’s recovery is unique, and it’s essential to follow the specific guidelines provided by your healthcare team. Generally, it takes time for the shoulder to heal and regain strength after surgery, so shooting should be approached with caution and gradual progression. 

You may need to wait several weeks or even months before attempting to shoot again. During the recovery period, you’ll likely undergo rehabilitation exercises to restore range of motion, strength, and stability to the shoulder.

Once your surgeon and physical therapist give you the green light, they may recommend starting with lighter loads and gradually increasing the intensity and frequency of shooting sessions. It’s crucial to listen to your body, pace yourself, and avoid pushing through pain or discomfort. 

In this article, the individual reported no pain at 6 months following a reverse bony bankart lesion, a surgery performed to reattach the posterior labrum to the bony surface of the scapula. 

In this study of 100 individuals, a high percentage of patients who had shoulder surgery were able to resume shooting. Around 60% of patients were able to shoot again after 6 months, and about 85% were able to do so after 1 year. Patients who had surgery on the opposite side of their dominant shooting hand returned to shooting faster. However, patients who had arthroscopic posterior labral repair returned to shooting at a slower rate compared to other types of shoulder stabilization surgeries.

By following the guidance of your medical professionals and gradually reintroducing shooting activities, you can safely return to enjoying your passion for shooting after shoulder surgery.

Rotator cuff injury: still able to shoot?

Yes. But, shooting a gun with a torn rotator cuff can be challenging and potentially worsen the injury if not approached with caution. The rotator cuff is a group of muscles and tendons that provide stability to the shoulder joint.

When a rotator cuff tear occurs, it can result in pain, weakness, and limited range of motion. If you choose to continue shooting with a shoulder injury, it is important to prioritize safety and take measures to minimize further strain on the injured area. 

Here are some tips to safely continue shooting with a torn rotator cuff:

1. Seek Medical Advice: Before continuing any shooting activities, consult with your healthcare provider or orthopedic specialist to assess the severity of your rotator cuff tear and receive specific guidance regarding shooting restrictions or modifications.

2. Modify Shooting Technique: Adjust your shooting technique to reduce stress on the injured shoulder. For example, consider shooting from a supported position, such as using a shooting rest or bipod, to minimize the weight and recoil absorbed by your shoulder.

3. Use Recoil Reducing Accessories: Recoil can be particularly challenging for a torn rotator cuff. Utilize recoil-reducing accessories such as recoil pads or shoulder braces to help absorb and distribute the impact of the recoil, reducing strain on the injured area.

4. Take Regular Breaks: Shooting can be physically demanding, even for individuals without shoulder injuries. Take frequent breaks during shooting sessions to rest your shoulder and prevent excessive fatigue that could lead to compromised form and increased risk of injury.

5. Strengthen Supporting Muscles: Engage in a comprehensive physical therapy program to strengthen the muscles surrounding the shoulder, including the rotator cuff muscles. Strengthening these muscles can provide better stability and support to the injured shoulder during shooting activities.

6. Listen to Your Body: Pay close attention to any pain or discomfort during or after shooting. If you experience increased pain or worsening symptoms, it is crucial to stop shooting and consult with your healthcare provider.

In conclusion

Remember, it is essential to prioritize health and recovery. If shoulder pain persists or worsens, it may be necessary to take a break from shooting and focus on proper rehabilitation and treatment to address the shoulder pain.

As an Amazon Affiliate, I earn from qualifying purchases at no extra cost to the buyer.

About the Author

About the Author

Taylor Kuhlmann, PT, DPT, CSCS

Taylor is a licensed physical therapist, certified strength and conditioning specialist accredited by the National Strength and Conditioning Association, an avid outdoorsman, and the founder of High Caliber Health.

With a passion for guiding hunters and outdoor enthusiasts, Taylor focuses on enhancing their overall health and wellness, enabling them to experience the outdoors with reduced pain and enhanced performance.

The Importance of Exercise for Hunters: Improving Stamina, Reducing Pain, and Enhancing Balance

The Importance of Exercise for Hunters: Improving Stamina, Reducing Pain, and Enhancing Balance

The Importance of Exercise for Hunters: Improving Stamina, Reducing Pain, and Enhancing Balance

Introduction

If you’re serious about dominating the great outdoors, it’s time to give exercise the attention it deserves. Exercise isn’t just about staying fit—it’s about boosting your stamina, reducing pain, and unleashing your inner hunting beast! As a physical therapist, strength and conditioning specialist, and an avid hunter, I’m here to show you why exercise is the key to becoming a true hunting legend. My goal is to assist you in improving health and wellness so you can enjoy the outdoors for life. So, let’s gear up and embark on this exciting adventure together!

Defying the Hands of Time

As we get older, our bodies may not be as agile as they used to be. But don’t worry – there is something you can do about it! Exercise works like magic for hunters. By lifting weights and doing resistance training, you can keep your hard-earned muscles and stay strong. No more struggling with heavy gear or tough terrain. Stay fit and stay sharp!

Read this entire paragraph in the photo below!

Muscle mass decreases with age.

It’s important to recognize the fact that we lose muscle as we age, as early as 30 years old! Also, take a look at the sentence regarding the progressive increase in fat mass. It’s alarming. We’re losing strength and gaining fat mass – no wonder why we hurt as we get older! 

If you don’t maintain your activity level, there is no doubt you will lose the ability to stay hunting and spending time outdoors. Start now!

Stress? Not in Our Hunting Grounds

Life can certainly be stressful and overwhelming. But guess what? Exercise is our secret weapon against stress and anxiety. When you work up a sweat, your body releases feel-good chemicals called endorphins that make you feel like a boss and lowers stress levels. So, turn on some tunes, get outdoors, and say goodbye to the stress. A decrease in stress will help you clear your mind and think better. This will certainly help improve your success with hunting, as well as all other aspects of life!

Master the Hunt with Grace and Agility

Imagine this: you’re quietly tracking your prey, navigating tricky terrain, and suddenly, oops! You stumble and crash like a clumsy bull. Not a good look, right? Well, exercise is here to save the day. By doing exercises that improve your balance and coordination, like traditional strength training or Yoga, you’ll move with the agility of a wildcat. No more embarrassing tumbles. You’ll glide through the woods like a true hunting pro.

Inspire a New Generation of Hunters

As a father, I strive to spend valuable time with my children outdoors. When you embrace exercise and live a healthy lifestyle, you become a role model for the next generation. Just picture your little ones, wide-eyed and eager to follow in your footsteps on the next hunting adventure. Show them the way, so they can enjoy the outdoors for life. Take them along on your next turkey hunt, teach them to bait a hook, and let them see the strength and vitality that comes from embracing the wild side. They’ll grow up strong and resilient, just like their hunting hero.

Kid sitting in duck blind
Kid on a successful Spring turkey hunt

Conclusion

So, it’s time to unlock your true potential. Exercise is your ticket to becoming the ultimate hunting legend. Embrace the weights, conquer stress, perfect your balance, and inspire the next generation to embrace their wild side. And remember, have some fun along the way because life’s an adventure meant to be enjoyed. Now go out there and make your mark on the hunting world. Happy hunting!

Improving Posture and Alignment for Hunters

Improving Posture and Alignment for Hunters

Improving Posture and Alignment for Hunters

Introduction

For hunters and outdoor enthusiasts, good posture and spinal alignment are essential for performing at a high level and reducing the risk of injury. In this blog post, I’ll highlight the benefits of proper posture and alignment for hunting and outdoors activities, common posture and alignment issues that hunters and outdoor enthusiasts may face, and techniques for improve posture and spinal alignment.

The Fundamentals: Understanding Good and Bad Posture

Poor posture is often defined as having a forward head and rounded shoulders. Some people also refer to poor posture as a “hunchback” position, in which the thoracic spine is rounded as well. However, poor posture is not always the main cause of neck, shoulder, or back pain. As a physical therapist, I have encountered individuals who have poor posture but do not experience the typical pain associated with it.

In contrast, good posture is described as standing upright with engaged shoulder blades, and with the head, neck, shoulders, and hips aligned in a straight line.

Regardless of your posture, it is important to move in and out of certain positions throughout the day to prevent aches, pains, and movement dysfunctions. Maintaining the same posture for an extended period can lead to discomfort and increase the risk of injury.

For hunters, assuming different postures and positions is necessary for success. I’m not sure I’ve ever been on a hunt where I haven’t thought, “damn, I hope I don’t’ have to hold this position too long.” It is crucial for hunters to maintain flexibility and strength, move often, and recognize postural abnormalities while hunting to prevent injury and maximize success.

The Performance Benefits of Proper Posture and Alignment

Good posture and alignment can have a significant impact on performance and injury risk during hunting and outdoor activities. When your body is in proper alignment, you can move more efficiently and with less effort, which can help conserve energy and increase endurance. Additionally, good posture and alignment can improve your balance and stability, making it easier to move over uneven terrain and maintain your footing.

Here’s an activity that will show you how a rounded back and forward shoulders can negatively impact your performance with overhead activities. While sitting or standing, slouch over and round your shoulders forward. Then reach as high as you can with both arms and appreciate how high you can reach. Next, sit or stand up nice and tall with “good posture.” Then repeat the overhead reaching with both arms. Notice how much more shoulder and spinal range of motion is achieved.

Proper posture and alignment can also reduce the risk of injury. When your body is in proper alignment, there is less strain on your joints, muscles, and other tissues. This can reduce the risk of overuse injuries, such as tendinitis and bursitis, as well as acute injuries, such as sprains and strains.

Shoulder impingement, rotator cuff tendinitis, and neck pain are a few conditions that hunters experience from poor shooting form and posture with archery.

Common Posture and Alignment Issues for Hunters and Outdoors Enthusiasts

Hunters and outdoors enthusiasts may face a variety of posture and alignment issues that can affect their performance and injury risk. For example, carrying heavy packs or equipment can cause the shoulders to round forward, which can increase the risk of shoulder and low back injuries and reduce lung capacity. Sitting on a bucket in a ground blind can cause a posterior pelvic tilt, leading to low back pain or sciatica symptoms.

To find your neutral pelvis position, perform an anterior and posterior pelvic tilt as far as you can in both directions. Your neutral position is midway between the extreme ranges of motion. Once you find your neutral pelvic position, perform core and hip strengthening exercises while maintaining this position. Improving awareness of your pelvis positioning will allow you to make postural adjustments and alleviate pain while hunting.

Other common posture and alignment issues for hunters and outdoors enthusiasts include a forward head posture, which can cause neck and shoulder pain, or a weak core, which can affect balance and stability. These issues can be compounded by spending long periods of time sitting or standing in one position, which can cause muscles to become tight or fatigued.

Techniques to Improve Posture and Spinal Alignment

There are several techniques that hunters and outdoors enthusiasts can use to improve their posture and alignment. First, it’s important to be aware of your posture and alignment throughout the day. Take breaks and change positions frequently. When carrying heavy loads, use a backpack or other equipment designed to distribute weight evenly across your body.

Exercises can also be helpful for improving posture and alignment. Core strengthening exercises, such as planks and bird dogs, can improve stability and reduce the risk of lower back pain. Stretching exercises, such as hip flexor stretches and chest stretches, can help improve posture by reducing muscle tension. Prone press-ups and thoracic extension and rotation exercises are also gold when it comes to postural corrective exercises.

I recommend exercise snacks every 45-60 minutes. Exercise snacks can include a short walk, desk exercises with emphasis on thoracic extension, or laying on your stomach for a few minutes. A few minutes of exercise or movement spread throughout the day can yield substantial benefits for posture and pain relief.

Additional Considerations: Footwear, Carrying Loads, and Hydration

In addition to posture and alignment, there are several other factors that can affect performance and injury risk during hunting and outdoors activities. For example, footwear is an important consideration, as wearing the wrong shoes or boots can cause foot and ankle injuries. It’s important to choose footwear that is appropriate for the terrain and provides adequate support and cushioning.

Hunting boots that I can recommend as a physical therapist are the Danner and Crispi brands. I’ve put many of miles on these brands of boots while hunting elk through the Rocky Mountains and pheasants through snow in the Kansas terrain.

Carrying heavy loads can also be a significant challenge, both for posture and alignment and for overall performance. It’s important to distribute weight evenly and use equipment that is designed to reduce the strain on your body. Find a hunting pack that fits your body and is comfortable. There are many, many brands and options, but some are extremely pricey. The Tidewe brand has a few cheaper versions which worked great for my last elk hunt.

Additionally, staying hydrated and properly fueling your body with nutrition can help improve performance and reduce the risk of injury.

Conclusion: Prioritize Posture and Alignment for Success in Hunting and Everyday Life

Proper posture and alignment are essential for performing well and reducing the risk of injury during hunting and outdoors activities. By being aware of your posture and alignment, doing exercises to improve your core and stretching regularly, and taking breaks to change positions and move around, you can improve your posture and alignment and reduce your risk of injury.

“Bad posture” may or may not contribute to aches and pains. The key point from this post is to improve awareness of your posture and to move frequently throughout your daily routine.

Remember, good posture and alignment are not just important during hunting and outdoors activities, but also in your daily life. By incorporating these techniques into your routine, you can improve your overall health and wellbeing and perform at your best both in the great outdoors and in everyday activities. So, take the time to prioritize proper posture and alignment, and enjoy all the benefits that come with it.

Happy hunting!

Hunting and Optimal Performance: The Role of Physical Therapy and Strength Training

Hunting and Optimal Performance: The Role of Physical Therapy and Strength Training

Hunting and Optimal Performance: The Role of Physical Therapy and Strength Training

Introduction

As a physical therapist, strength and conditioning specialist, and an avid hunter, I understand the importance of maintaining optimal physical health and performance in the field. Hunting requires a unique combination of endurance, strength, agility, and precision. In this blog post, we will explore the ways physical therapy and strength training can enhance your hunting experience, reduce the risk of injuries, and improve overall performance. Let’s dive in!

Assessing and Addressing Musculoskeletal Imbalances

Before embarking on any physical activity, it’s crucial to assess and address any musculoskeletal imbalances or weaknesses. A comprehensive evaluation by a physical therapist can identify potential areas of concern, such as joint restrictions, muscular imbalances, or poor movement patterns that may hinder your hunting performance. By addressing these issues through targeted exercises and corrective techniques, you can improve your body’s functional capacity and reduce the risk of hunting-related injuries.

Enhancing Endurance and Stamina

Hunting often requires long hours of walking, climbing, and tracking game, which can place significant demands on your cardiovascular system. Building endurance and stamina is essential for sustained performance in the field. Incorporating aerobic exercises such as jogging, cycling, or hiking into your training routine can improve your cardiovascular fitness and help you maintain peak performance throughout your hunting trips.

Building Strength and Power

Strength and power are crucial for successful hunting. Whether it’s carrying heavy gear, pulling back a bowstring, or maneuvering through challenging terrains, having adequate strength is paramount. Strength training exercises, such as squats, deadlifts, and lunges, can help you build the necessary muscle strength for these tasks. Additionally, incorporating power exercises like plyometrics and medicine ball throws can enhance your explosive movements, enabling quicker reactions and more efficient hunting techniques.

Enhancing Flexibility and Mobility

Flexibility and mobility play a vital role in hunting, as they improve your ability to move through various positions and angles. Poor flexibility can restrict your movement and increase the risk of muscle strains or joint injuries. Regular stretching and mobility exercises targeting specific muscle groups can improve your range of motion and reduce the likelihood of injuries while hunting. Incorporating exercises like yoga or dynamic stretching routines can help enhance flexibility and joint mobility, ultimately improving your overall performance in the field.

Injury Prevention and Rehabilitation

Despite careful preparation, injuries can still occur while hunting. Physical therapists are skilled in preventing and rehabilitating hunting-related injuries. By utilizing their expertise, you can learn proper techniques for injury prevention, including safe lifting mechanics, balance training, and proprioceptive exercises. In the unfortunate event of an injury, a physical therapist can guide you through a customized rehabilitation program, facilitating your return to hunting as quickly and safely as possible.

Conclusion: As a physical therapist, strength and conditioning specialist, and passionate hunter, I strongly believe that physical therapy and strength training are essential components for optimizing hunting performance. By addressing musculoskeletal imbalances, improving endurance, building strength and power, enhancing flexibility, and focusing on injury prevention and rehabilitation, you can experience a significant improvement in your overall hunting abilities. So, invest in your physical health, take your hunting skills to the next level, and enjoy a safer and more rewarding hunting experience!

Remember to consult with a licensed physical therapist or healthcare professional before starting any new exercise or training program. Stay safe and happy hunting!

Taylor Kuhlmann

Physical Therapist & Strength and Conditioning Specialist

Taylor Kuhlmann, physical therapist

6 Tips for Safe Tree Stand Climbing After Knee Replacement Surgery

6 Tips for Safe Tree Stand Climbing After Knee Replacement Surgery

6 Tips for Safe Tree Stand Climbing After Knee Replacement Surgery

Climbing a tree stand is a thrilling and exciting activity, especially when you’re after your target buck. Making the first climb up a tree stand after a total knee replacement can be daunting. If you have recently undergone a total knee replacement surgery, it’s essential to take extra precautions to ensure your safety when climbing.

The first week or two after a total knee replacement surgery can be challenging, especially when it comes to walking and climbing stairs. In most cases, patients will spend one night in the hospital before going home. During this time, a physical therapist will initiate physical therapy to help restore your gait pattern, range of motion, and ability to navigate stairs safely. Out-patient physical therapy typically starts 3-5 days after the operation.

Before attempting to climb a tree stand, it’s vital to consult with your orthopedic physician and physical therapist to ensure it’s safe. A physical therapist can assess your range of motion, strength, and knee stability to determine if you’re ready to make the ascent.

Assuming you have the green light from your medical team, here are some tips for safely climbing a tree stand after a total knee replacement.

Let’s take a look at the 6 Tips for Safe Tree Stand Climbing After Knee Replacement Surgery:

1) Safety first

If you are hunting from a tree stand after undergoing a total knee replacement surgery, safety should be your top priority. One way to enhance your safety is by using a full-body harness system and safety line, which can provide extra reassurance and help prevent falls. The Hunter Safety System offers a range of products that are trusted by many hunters. 


After a total knee joint replacement, the risk of slipping on a step increases due to impaired joint receptors, or proprioception. You may experience difficulty in accurately placing your foot or lower leg on the step because you may not have a clear sense of where it is in space. Impaired range of motion, strength, and joint awareness can cause an increased risk of falling.


Following post-operative guidelines and recommendations of a physical therapist can aid in a faster and optimal recovery to help maximize performance with hunting after a total knee replacement.

2) Take it slow

After a knee replacement surgery, your knee may require you to slow down and watch your steps while accessing the stand. Consider the terrain where your tree stand is located, including creek banks, water crossings, and fence lines. If possible, try to hang your stand in an easily accessible tree to avoid the difficulties of getting to and from the stand. Also, try a trial climb a time or two before you climb the stand to sit for a hunt. This will give you a change to develop a plan and boost your overall confidence.


Some hunters have found it helpful to hang the same climbing sticks and stand in a separate location for practice. This enables you to work on safely climbing in and out of the stand without disturbing the deer in your preferred hunting spot. While it may require extra effort, practicing in this way can increase your chances of successfully tagging your target buck following a total knee replacement surgery.

3) Use a haul line

With a roll of para cord and a carabineer you can make a haul line very easily. Install these when you hang your stand so it’s ready to use the next time you climb the tree stand. Tie one end of the para cord to a branch at the top of your stand and allow the carabineer to fall to ground level. The carabineer will easily clip to your equipment and allow you to be hands-free when climbing the tree stand. Carabineers are especially useful during cold weather. The ease of clipping them to your equipment allows you to do this while wearing gloves, so you don’t have to take the time to take your gloves off and on and introduce the hands to cold weather.


To reduce the weight you are carrying up the tree stand, use a haul line to pull up your equipment. A research study has shown that losing one pound of weight can reduce the pressure through the knee joint four-fold. Using a haul line to pull up a 10-pound bow can reduce 40 pounds of pressure through your knee joint. This can make a significant difference in your ability to climb the tree stand successfully.

4) Use proper technique

Navigating stairs and uneven terrain will occur long before you are ready to climb a tree stand after a total knee replacement surgery. When navigating stairs, you will use your non-surgical leg to control the effects of gravity and minimize stress and pain to the surgical leg. Some individuals remember the saying, “up with the good, down with the bad,” to help remember which foot to place on the step when navigating stairs post-operatively.

When ascending stairs after a total knee replacement surgery:

      • Use handrails or an assistive device to help maintain balance,
      • Step up with the non-surgical leg, and
      • Use a step-to gait pattern.

When descending stairs after a total knee replacement surgery:

      • Use handrails or an assistive device to help maintain balance,
      • Step down with the surgical leg, and
      • Use a step-to gait pattern.

The non-surgical and strong leg is used to raise and lower the body against gravity. These tips are also applied to the stairs of a ladder stand or climbing sticks leading up to your tree stand. It is very important to maintain three points of contact when climbing a tree stand to reduce the risk of falling.

5) Climbing sticks and stand placement

When it comes to climbing sticks and stand placement, planning ahead is crucial. Proper installation of the climbing sticks and stand in a tree can significantly enhance your safety and performance when transitioning between the climbing sticks and stand platform.


For optimal safety, I recommend attaching the platform and stand on the opposite side of your surgical leg. This allows you to use your strong, non-surgical leg to climb in and out of the stand, following the principle of “up with the good, down with the bad.” This means you’ll be standing on your surgical leg at the top of the climbing sticks while stepping up to the platform with your non-surgical leg.


Lastly, try to avoid any twisting or pivoting while standing on your surgical leg, as this can increase pain and instability, which may compromise your safety and performance while climbing a tree stand after a total joint replacement. If possible, using a ladder stand or ground blind can provide easier access.

6) Strengthen your knee

Strength training is essential to ensure you have the necessary strength to climb a tree stand. After a knee surgery, you will experience joint swelling, impaired range of motion, pain, and weakness from arthrogenic muscle inhibition.


A physical therapist can guide your recovery process to help address the post-operative limitations and assist you in developing a strength training program that will help you build the necessary leg strength and endurance to resume hunting after a total knee joint replacement.


Here is a sample exercise program that focuses on restoring knee extension range of motion and quad strength after a total knee replacement:

1. Heel slides

Lie on your back with your legs straight out in front of you. Slide your heel back towards your buttocks as far as you can comfortably go, then slide it back out straight. Repeat for 10-15 reps, 3-5 times per day.


2. Quadriceps sets

Sit on your chair or lie on your back with your legs straight out in front of you. Tighten your thigh muscles and press the back of your knee down into the bed or chair. Hold for 3-5 seconds and release. Repeat for 10-15 reps, 3-5 times per day.


3. Straight leg raises

Sit on a chair or lie on your back with your legs straight out in front of you. Lift your operated leg up off the bed or chair, keeping it straight. Repeat 8-12 reps, 3-5 times per day.


4. Knee extension stretch

Sit on a chair with your feet flat on the floor. Slide your operated leg out straight in front of you, keeping your heel on the floor. Prop your ankle on a towel roll or pillow for an increased stretch. Hold for 3-5 minutes and repeat 3-5 times per day. *Restoring full knee extension is very important following a total knee replacement.


In conclusion, by following these tips, you can safely enjoy climbing a tree stand after a total knee joint replacement surgery. It is important to think ahead and consider taking a few trial runs (mentally and physically) before you climb the stand this upcoming hunting season.

With the right precautions and technique, you can enjoy spending time in the tree stand after undergoing a total knee replacement surgery, all while protecting your newly repaired knee.


How long do I need to use a walker after a total knee joint replacement surgery?

This varies from person-to-person. Generally speaking, an individual will transition to a walking cane or no assistive device in 1-2 weeks following a total knee joint replacement surgery. It is important to normalize your walking pattern and feel confident in the knee before wondering away from the walker.


How long does it take to recover after a total knee joint replacement surgery?

Out-patient physical therapy can range anywhere from 2-8 weeks in duration. At the three month postoperative mark most people will be able to resume normal daily activities comfortably. The total recovery following a total knee joint replacement can take up to a total of 12 months for optimal recovery.


Source: National Center for Biotechnology Information. “PUBMED – National Center for Biotechnology Information.” Weight loss reduces knee-joint loads in overweight and obese older adults with knee osteoarthritis – PubMed (nih.gov). Accessed 1-9-2023.