11 Best Exercise Equipment for Shoulders

11 Best Exercise Equipment for Shoulders

11 Best Exercise Equipment for Shoulders

These 11 exercise equipment options for shoulder pain relief are affordable, user-friendly, and highly effective in reducing shoulder pain and improving overall function.  

As a physical therapist, strength and conditioning specialist, and avid hunter, I understand the importance of optimizing physical fitness to enhance hunting performance while minimizing pain and discomfort. 

In this blog post, we will explore the 11 best exercise equipment options for shoulder pain that can help you achieve your fitness goals, improve hunting performance, and ultimately enhance your overall hunting experience. 

Each of these 11 exercise equipment options for shoulder pain have been carefully selected to cater to the unique demands of hunting, ensuring that you are well-prepared for the challenges that lie ahead.
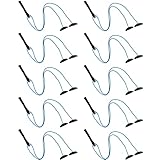
1.  Shoulder Pulley

The shoulder pulley system is an invaluable tool for improving range of motion and functionality in the shoulder joint. One effective technique to achieve this is by performing an active assisted range of motion exercises using the shoulder pulley, with assistance from the opposite extremity. This technique minimizes pain and discomfort while maximizing the benefits of the exercise.

By incorporating the shoulder pulley system into your training routine, you can specifically target movements crucial for hunting, such as reaching overhead when climbing a tree stand.

The pulley exercises allow you to simulate the exact motions involved in overhead reaching, helping to improve your range of motion and enhance your overall hunting performance.

2.  Shoulder Dowel Rod

The dowel rod is a versatile tool that can be used to perform active assisted exercises and shoulder stretches, effectively improving mobility in the shoulder joint. This is particularly beneficial for individuals experiencing limited range of motion due to conditions such as arthritis, frozen shoulder, or rotator cuff tendonitis.

By utilizing the dowel rod in various positions, such as supine (lying down), seated, or standing, you can target specific movements and stretches to enhance range of motion and overall function of the shoulder joint.

For active assisted exercises, the dowel rod can be held with both hands while performing movements that require external rotation, abduction, or flexion of the shoulder joint. This assists in overcoming any restrictions or discomfort, gradually increasing the range of motion. The dowel rod provides stability and control, allowing for safer and more effective exercises.

In addition to active assisted exercises, the dowel rod can be used for shoulder stretches. By holding the dowel rod with a wider grip, you can perform gentle stretching movements, such as internal and external rotation stretches or cross-body stretches. These stretches help lengthen and release tight muscles and tendons around the shoulder joint, promoting improved mobility and reducing discomfort.

Whether you are lying down, seated, or standing, incorporating the dowel rod into your shoulder mobility exercises and stretches can greatly benefit those with limited range of motion due to conditions like arthritis, frozen shoulder, or rotator cuff tendonitis. It provides support, assistance, and increased control, allowing you to gradually improve range of motion and overall function of the shoulder joint.

3.  Theraband

Therabands are highly useful for strengthening the shoulder and improving stability, making them an excellent tool for hunters. These elastic bands provide constant tension throughout the exercises, allowing for maximal engagement of the shoulder muscles and promoting strength and stability gains.

By incorporating therabands into your shoulder strengthening routine, you can target specific muscle groups involved in shoulder stability, such as the rotator cuff muscles. The resistance provided by the theraband challenges these muscles, helping to improve their strength and endurance. Stronger shoulder muscles contribute to better stability, reducing the risk of injuries and enhancing overall performance during hunting activities.

One of the advantages of therabands is their portability. They are lightweight, compact, and easily transportable, making them ideal for hunters who are always on the move. Therabands can be conveniently packed into a duffle bag, taking up minimal space and ensuring you can continue your shoulder-strengthening exercises while on hunting trips.

Moreover, therabands can be utilized during the hunts if needed. If you experience shoulder fatigue or weakness while in the field, a theraband can be quickly retrieved from your pack to perform some simple strengthening exercises. This on-the-go accessibility allows you to maintain and reinforce your shoulder stability even during hunting activities, reducing the risk of fatigue-related injuries and enhancing your performance in challenging situations.

To make the most of therabands for shoulder strengthening, it’s essential to consult with a physical therapist or strength and conditioning specialist. They can guide you in selecting the appropriate resistance level and exercises that target your specific needs and goals. Proper form and technique should also be emphasized to ensure optimal effectiveness and reduce the risk of injury.
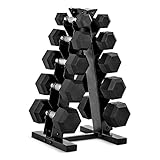
4.  Dumbbells

Dumbbells are classic strength training tools that can help build overall body strength, stability, and coordination. Incorporating dumbbell shoulder exercises into your training regimen can improve your upper body strength, enhance your posture, and support proper body mechanics while aiming and shooting.

5.  Bodyblade

The Bodyblade is an exceptional and versatile tool that offers low-impact, oscillatory resistance training. This unique device is designed to challenge and improve multiple aspects of your physical fitness, including core stability, shoulder endurance, coordination, and shoulder stability.

When used regularly, the Bodyblade can have a significant impact on your hunting performance. By incorporating it into your training routine, you can enhance your ability to maintain a steady aim and effectively control recoil when firing your weapon. This, in turn, can greatly improve your shooting accuracy in the field.

The Bodyblade can be used with one or both arms, allowing you to target specific areas of weakness and reinforce the stability of the shoulder joint. With its ability to engage the muscles around the shoulder, the Bodyblade can be instrumental in reducing shoulder pain and promoting a return to normal activities with less discomfort.

To maximize the benefits of the Bodyblade, it is recommended to consult with a qualified physical therapist or strength and conditioning specialist. They can guide you in performing exercises with proper form and technique, ensuring optimal results while minimizing the risk of injury.

6.  Kettlebells

Kettlebells are excellent tools for developing total-body strength, power, and stability. The unique design of the kettlebell allows for a wide range of dynamic exercises that simulate the demands of hunting, such as squatting, lunging, and carrying heavy loads. Incorporating kettlebell swings, goblet squats, and farmer’s walks into your training routine can enhance your muscular endurance, explosiveness, and overall functional fitness.

Kettlebells are an effective tool for reducing shoulder pain and improving shoulder function. By incorporating kettlebell exercises into your workout routine, you can strengthen the muscles surrounding the shoulder joint, improve stability, and enhance overall shoulder mobility. The dynamic movements involved in kettlebell exercises engage multiple muscle groups simultaneously, promoting balanced muscle development and reducing imbalances that may contribute to shoulder pain. Additionally, kettlebell exercises promote proper movement patterns and alignment, which can help alleviate stress on the shoulder joint. With their versatility and ability to target specific muscle groups, kettlebells offer a comprehensive approach to reducing shoulder pain and improving overall shoulder health.

7.  The Axio Centripetal Trainer

The Axio Centripetal Trainer is a rotational training tool specifically designed to improve core strength, stability, and rotational power. By incorporating exercises with the Axio Centripetal Trainer into your training routine, you can enhance your ability to twist, turn, and maintain balance while maneuvering through uneven terrains during hunting expeditions.

Visit this site to check out the Axio Centripetal Trainer. 

8.  Weighted Exercise Balls

Weighted exercise balls are an excellent tool for performing upper body plyometric or dynamic strengthening exercises, specifically targeting the rotator cuff muscles. By incorporating these exercises into your workout routine, you can effectively enhance the strength and stability of the rotator cuff.

The weight of the exercise balls adds resistance, increasing the challenge and activating the muscles in a controlled and dynamic manner. These exercises promote explosive power, coordination, and stability, which are essential for shoulder health and function.

By engaging in upper body plyometric or dynamic strengthening exercises with weighted exercise balls, you can improve the strength, endurance, and overall performance of the rotator cuff muscles, ultimately reducing the risk of injuries and enhancing your shoulder’s stability and functionality.
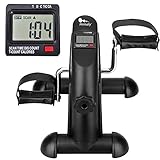
9.  Arm Bike

Using an arm bike can provide several benefits for reducing shoulder pain and improving shoulder function. This versatile equipment allows for targeted exercises that help improve range of motion, shoulder strength, and overall muscular endurance.

By utilizing the arm bike regularly, you can engage the muscles around the shoulder joint in a controlled and low-impact manner, promoting flexibility and mobility. The resistance settings on the arm bike can be adjusted to gradually increase the challenge, allowing for progressive strength training. The repetitive motion of pedaling the arm bike also helps improve muscular endurance, which is essential for reducing fatigue and discomfort during daily activities and hunting pursuits.

Incorporating the arm bike into your exercise routine can aid in alleviating shoulder pain, enhancing shoulder stability, and improving overall shoulder function.

10.  Trigger Point Release Tool

A trigger point release tool offers numerous benefits in reducing muscle tightness and discomfort caused by trigger points. This specialized tool allows for targeted pressure application to specific trigger points, helping to alleviate muscle knots and tension.

By applying pressure to these trigger points, blood flow is increased, and muscle fibers are encouraged to relax, promoting pain relief and improved range of motion. The ease of use and portability of a trigger point release tool make it a convenient option for self-treatment.

Whether at home or on the go, this tool can be easily used to target areas of muscle tightness and provide relief. Incorporating a trigger point release tool into your routine can aid in reducing muscle tension, improving flexibility, and enhancing overall physical well-being.

11.  Foam Roller

A foam roller is a versatile tool that can offer significant benefits for shoulder and spinal mobility, reducing muscle tightness, and relieving shoulder pain. By using a foam roller, you can apply targeted pressure to the muscles around the shoulder and along the spine, promoting myofascial release and loosening tight knots. This helps improve flexibility, range of motion, and overall mobility in these areas.

Additionally, the foam roller aids in increasing blood flow and oxygenation to the muscles, facilitating the healing process and reducing inflammation. Regular use of a foam roller can effectively alleviate muscle tightness, reduce shoulder pain, and improve overall shoulder and spinal health. Incorporating foam rolling into your routine can be a valuable self-care practice for maintaining optimal shoulder function and enhancing overall well-being.

Conclusion:

By incorporating the exercise equipment for shoulder pain into your fitness routine, you can optimize your physical capabilities, reduce the risk of injury, and enhance your hunting performance. Remember to consult with a qualified physical therapist or strength and conditioning specialist to ensure proper form and technique while using these tools. With dedication and consistent training, you’ll be well-prepared to tackle any hunting challenge that comes your way.

Note: Please consult with your healthcare provider or a qualified professional before starting any new exercise program or using any of the mentioned tools.

Disclosure: as an amazon affiliate, I earn commissions from qualifying purchases made through the links provided on this website and blog posts, which help support its maintenance and content creation.

About the Author

About the Author

Taylor Kuhlmann, PT, DPT, CSCS

Taylor Kuhlmann is a licensed physical therapist in Kansas, a certified strength and conditioning specialist accredited by the National Strength and Conditioning Association, and the founder of High Caliber Health. With a passion for guiding hunters and outdoor enthusiasts, Taylor focuses on enhancing their overall health and wellness, enabling them to experience the outdoors with reduced pain and enhanced performance.

Read more here…

Achilles Tendonitis: Best Treatment to Fix Pain and Weakness

Achilles Tendonitis: Best Treatment to Fix Pain and Weakness

Achilles tendonitis is typically diagnosed when an individual experiences pain along the Achilles tendon. It’s important to note that inflammation may or may not be present with this condition. The underlying cause of Achilles tendonitis often lies in poor healing after small tears occur along the tendon, leading to stiffness and impaired mobility in the ankle and foot.

Can you feel a bulging disc with your hand?

Can you feel a bulging disc with your hand?

No, you cannot feel a bulging disc with your hand. The intervertebral discs are situated deep within the spine, positioned between adjacent vertebrae. Each disc is surrounded by layers of skin, fascia (connective tissue), muscles, and bony prominences of the spine (spinous processes). Even the most skilled hands cannot physically palpate deep enough to “feel” a bulging disc.

Shotgun Recoil: Shoulder Pain After Shooting

Shotgun Recoil: Shoulder Pain After Shooting

Shotgun Recoil: Shoulder Pain After Shooting

Introduction

While the thrill of shooting a shotgun is undeniable, the forceful kickback can sometimes lead to discomfort or even pain in your shoulder. I want to discuss what seems to be a rather popular topic related to shooting shotguns: shoulder pain caused by recoil.

Shooting a few rounds may not cause much soreness, but an entire afternoon spent with friends engaging in skeet shooting or dove hunting can leave you waking up the next morning with some aching in the anterior shoulder. Personally, I think that’s a sign of a damned good time! 

Nonetheless, I’m here to provide valuable information and useful tips on how to effectively manage and alleviate shoulder pain caused by shotgun recoil. By understanding the underlying causes and implementing a few simple strategies, you’ll be able to enjoy your shooting adventures with increased comfort and ease. Let’s highlight the ways to keep your shoulders happy and pain-free after firing a shotgun!

What is shotgun recoil?

*Always practice gun safety*

Shotgun recoil refers to the backward force generated when shooting a shotgun. When you pull the trigger, the gunpowder inside the shotgun shell ignites, creating a powerful explosion that propels the pellets or slug out of the barrel. This explosive force pushes the shotgun backward, and as a result, an equal and opposite force, known as recoil, is transferred through the gun and into your shoulder. In simple terms, recoil is the kickback you feel when you shoot a shotgun, which can sometimes be quite strong. Understanding and managing this recoil is important to ensure a comfortable and enjoyable shooting experience.

How bad is shotgun recoil?

The severity of shotgun recoil can vary depending on several factors. Firstly, it depends on the specific shotgun gauge and load you’re using. Generally, shotguns with larger gauges, such as 12 gauge, produce more recoil compared to smaller gauges like 20-gauge or .410 bore. 

Additionally, the type of ammunition, such as the shot size and powder load, can influence the recoil. Furthermore, the design and weight of the shotgun itself play a role. Shotguns with heavier barrels and stocks tend to absorb more recoil, making them more comfortable to shoot. I’ve personally noticed a substantial difference in kick between my 20-gauge youth model Remington and my 1187 Remington. The 0-guage is much lighter and provides a substantial kick, while the 12-guage is heavier and absorbs some of the force, making the kick less intense. Thus, the weight and size of the firearm undoubtedly make a notable impact.

Lastly, individual factors like body size, strength, and shooting technique can also affect how one perceives shotgun recoil. While some recoil is inevitable, it’s essential to manage it properly to prevent discomfort or potential injuries.

Recoil bruise

Recoil bruise, also known as a recoil injury or shotgun bruise, is a common consequence of experiencing excessive shotgun recoil. When the force of the recoil is intense or improperly absorbed, it can cause bruising on the shoulder. A recoil bruise typically appears as a discolored area on the skin, ranging from light discoloration to dark purple or blue hues. The bruise occurs due to the blood vessels near the skin’s surface being damaged or broken by the sudden impact. 

Recoil bruises can be painful and tender to the touch. It is essential to take measures to prevent recoil bruising by using proper shooting techniques, ensuring a well-fitted shotgun, and employing recoil-absorbing accessories like recoil pads. If a bruise does occur, it will generally heal on its own within a week or two, but it’s advisable to consult a healthcare professional if there are concerns about the severity of the bruise or if it doesn’t improve over time.

The recoil pads below can be helpful at reducing shoulder pain after shooting. 

Treating a recoil bruise

When it comes to treating a recoil bruise, there are a few simple steps you can follow to promote healing and alleviate discomfort. Firstly, it’s important to apply a cold compress or ice pack to the affected area as soon as possible. This helps reduce swelling and numb the area, providing pain relief. Be sure to wrap the ice pack in a thin cloth to avoid direct contact with the skin. Applying the cold compress for 15-20 minutes at a time, several times a day, can be beneficial. 

Additionally, over-the-counter pain relievers like acetaminophen or ibuprofen can help alleviate pain and reduce inflammation. Resting the bruised area and avoiding activities that may exacerbate the pain is recommended. It’s crucial to allow the bruise to heal naturally, so avoid applying heat or massaging the area too vigorously, as this can worsen the bruising. If the bruise appears severe, causes intense pain, or shows signs of infection (such as increased redness, warmth, or discharge), it’s advisable to seek medical attention to ensure proper evaluation and care.

This ice pack is a great option to help with a sore shoulder after shooting a shotgun, or alleviating pain from every day use. It’s large enough to cover some of the pectoral and rotator cuff muscles, as well!

Shotgun recoil hitting cheek

When shooting a shotgun, the recoil force generated can sometimes cause the gun to hit your cheek, resulting in discomfort or even injury. This can happen when the gun is not properly shouldered or if the shooter’s stance or grip is incorrect. The impact of the gun hitting your cheek can be painful and may even leave a mark or bruise. To prevent this, it is crucial to ensure a proper shooting technique. This includes firmly shouldering the shotgun, positioning your cheek comfortably on the stock, and maintaining a stable and balanced stance.

Additionally, using a shotgun with appropriate stock dimensions and fit for your body can also help minimize the likelihood of the gun hitting your cheek. Remember, safety should always be a priority when handling firearms, so pay close attention to your shooting form and take necessary precautions to prevent any unnecessary discomfort or injury.

Labrum injuries from shooting

Labrum injuries can occur after shooting due to the repetitive and forceful movements involved in shotgun shooting. The recoil from shooting a shotgun can put significant stress on the shoulder, potentially causing the labrum to tear or become damaged.

Labrum injuries can result in symptoms such as shoulder pain, a feeling of instability or popping in the joint, decreased range of motion, and difficulty with certain movements.

Labrum

The labrum is a ring of cartilage that surrounds the shoulder socket, providing stability and support to the joint.

If you experience these symptoms after shooting, it is important to seek medical evaluation and diagnosis. Treatment for labrum injuries may include rest, physical therapy exercises to strengthen the shoulder muscles, and in severe cases, surgical repair.

It’s crucial to take measures to prevent labrum injuries by using proper shooting techniques, maintaining good shoulder strength and stability, and ensuring that your shotgun fits you well. 

With appropriate caution and proper shooting form, a labrum injury is not commonly caused by the actual shooting itself. If this happens, it’s likely the individual had an underlying labral tear that became aggravated by the repetitive recoil and stress to the shoulder.

Can a shotgun dislocate your shoulder?

While it is possible for a shotgun’s recoil to cause shoulder injuries, such as bruising or strains, dislocating your shoulder solely from shooting a shotgun is highly unlikely. Shotgun recoil typically generates a backward force that is absorbed by the shoulder joint and the surrounding muscles and tendons. 

Dislocating a shoulder usually requires a significant force or trauma, such as a fall or a sudden impact. However, it’s important to note that if you already have a pre-existing shoulder instability or a history of shoulder dislocation, the recoil from shooting a shotgun could potentially exacerbate the condition or increase the risk of a dislocation. 

If you have any concerns about the health and stability of your shoulder, it’s always a good idea to consult with a licensed physical therapist who can guide you in a strengthening program to improve the stability of the shoulder joint.

Shoulder muscles stabilizing the shoulder joint while shooting a shotgun.

The shoulder muscles play a crucial role in stabilizing the shoulder joint while shooting a shotgun. When you fire a shotgun, the recoil force generated travels through the gun and into your shoulder. This force can be quite powerful and potentially destabilizing if not properly controlled.

The shoulder muscles, including the deltoids, rotator cuff muscles, and the muscles of the upper back and chest, work together to provide stability and support to the shoulder joint during the recoil. 

By engaging and strengthening these muscles, you can better absorb and distribute the recoil force, reducing the impact on the shoulder joint and minimizing the risk of injury. Additionally, having strong and stable shoulder muscles helps maintain proper shooting form and accuracy, as it allows for better control of the shotgun. Therefore, it is vital to prioritize shoulder muscle strength and stability through regular exercise and conditioning, enabling you to enjoy a more comfortable and controlled shooting experience.

Where do you shoulder a gun?

Proper shouldering position is crucial when shooting a shotgun to ensure stability, control, and minimize the risk of injuries. To achieve the correct shouldering position, start by placing the buttstock firmly against the pocket of your shoulder, where the shoulder meets the chest. The stock should rest snugly in this pocket, allowing for a solid connection between your body and the shotgun. Position your head in alignment with the shotgun’s barrel, with your cheek lightly touching the stock. This position, known as the “cheek weld,” helps provide a consistent sight picture and improves accuracy. Maintain a relaxed but firm grip on the forearm of the shotgun, allowing for controlled movement and absorption of recoil. 

Where to shoulder a gun

Green photo: great cheek contact and positioning of the butt of the gun on the pocket of the shoulder.

Red photo: incorrect placement of the butt of the gun on the deltoid/biceps area. This CAN be painful.

Where NOT to shoulder a gun

Keeping the shotgun shouldered properly throughout the shooting process helps maintain balance and control, allowing you to shoot with greater accuracy and comfort. Regular practice and proper shouldering technique can contribute to a more enjoyable and successful shooting experience.

When can you shoot after shoulder surgery?

The timing of when you can resume shooting after shoulder surgery depends on several factors, including the type and extent of the surgery, as well as the recommendations of your surgeon and physical therapist.

Each person’s recovery is unique, and it’s essential to follow the specific guidelines provided by your healthcare team. Generally, it takes time for the shoulder to heal and regain strength after surgery, so shooting should be approached with caution and gradual progression. 

You may need to wait several weeks or even months before attempting to shoot again. During the recovery period, you’ll likely undergo rehabilitation exercises to restore range of motion, strength, and stability to the shoulder.

Once your surgeon and physical therapist give you the green light, they may recommend starting with lighter loads and gradually increasing the intensity and frequency of shooting sessions. It’s crucial to listen to your body, pace yourself, and avoid pushing through pain or discomfort. 

In this article, the individual reported no pain at 6 months following a reverse bony bankart lesion, a surgery performed to reattach the posterior labrum to the bony surface of the scapula. 

In this study of 100 individuals, a high percentage of patients who had shoulder surgery were able to resume shooting. Around 60% of patients were able to shoot again after 6 months, and about 85% were able to do so after 1 year. Patients who had surgery on the opposite side of their dominant shooting hand returned to shooting faster. However, patients who had arthroscopic posterior labral repair returned to shooting at a slower rate compared to other types of shoulder stabilization surgeries.

By following the guidance of your medical professionals and gradually reintroducing shooting activities, you can safely return to enjoying your passion for shooting after shoulder surgery.

Rotator cuff injury: still able to shoot?

Yes. But, shooting a gun with a torn rotator cuff can be challenging and potentially worsen the injury if not approached with caution. The rotator cuff is a group of muscles and tendons that provide stability to the shoulder joint.

When a rotator cuff tear occurs, it can result in pain, weakness, and limited range of motion. If you choose to continue shooting with a shoulder injury, it is important to prioritize safety and take measures to minimize further strain on the injured area. 

Here are some tips to safely continue shooting with a torn rotator cuff:

1. Seek Medical Advice: Before continuing any shooting activities, consult with your healthcare provider or orthopedic specialist to assess the severity of your rotator cuff tear and receive specific guidance regarding shooting restrictions or modifications.

2. Modify Shooting Technique: Adjust your shooting technique to reduce stress on the injured shoulder. For example, consider shooting from a supported position, such as using a shooting rest or bipod, to minimize the weight and recoil absorbed by your shoulder.

3. Use Recoil Reducing Accessories: Recoil can be particularly challenging for a torn rotator cuff. Utilize recoil-reducing accessories such as recoil pads or shoulder braces to help absorb and distribute the impact of the recoil, reducing strain on the injured area.

4. Take Regular Breaks: Shooting can be physically demanding, even for individuals without shoulder injuries. Take frequent breaks during shooting sessions to rest your shoulder and prevent excessive fatigue that could lead to compromised form and increased risk of injury.

5. Strengthen Supporting Muscles: Engage in a comprehensive physical therapy program to strengthen the muscles surrounding the shoulder, including the rotator cuff muscles. Strengthening these muscles can provide better stability and support to the injured shoulder during shooting activities.

6. Listen to Your Body: Pay close attention to any pain or discomfort during or after shooting. If you experience increased pain or worsening symptoms, it is crucial to stop shooting and consult with your healthcare provider.

In conclusion

Remember, it is essential to prioritize health and recovery. If shoulder pain persists or worsens, it may be necessary to take a break from shooting and focus on proper rehabilitation and treatment to address the shoulder pain.

As an Amazon Affiliate, I earn from qualifying purchases at no extra cost to the buyer.

About the Author

About the Author

Taylor Kuhlmann, PT, DPT, CSCS

Taylor is a licensed physical therapist, certified strength and conditioning specialist accredited by the National Strength and Conditioning Association, an avid outdoorsman, and the founder of High Caliber Health.

With a passion for guiding hunters and outdoor enthusiasts, Taylor focuses on enhancing their overall health and wellness, enabling them to experience the outdoors with reduced pain and enhanced performance.

Bow Arm Shoulder Pain: A Common Issue Among Archers and Bowhunters

Bow Arm Shoulder Pain: A Common Issue Among Archers and Bowhunters

Bow Arm Shoulder Pain: A Common Issue Among Archers and Bowhunters

Introduction

Shooting a bow can be an exhilarating experience, but it can also lead to bow arm shoulder pain, a common issue among archers and bowhunters. In this blog post, I will discuss the causes, prevention, and management of bow arm shoulder pain, and provide tips to keep archers and bowhunters pain-free.

Bow arm vs. Draw Arm

It’s important to differentiate the bow arm vs. the draw arm. For a right-handed shooter, the left arm is the bow arm, and the right arm is the draw arm. The bow arm holds the bow up against gravity and steadies the peep on the target, while the draw arm pulls the string and anchors at full draw. The left and right upper extremities perform different movements while shooting a bow, which can lead to pain and dysfunctions in the shoulder and arms if proper care and archery form is neglected.

Bow arm vs. Draw arm

Causes of Bow Arm Shoulder Pain

Shoulder pain is almost inevitable for archers and bowhunters due to the repetitive motion of shooting a bow. This motion puts significant stress on the shoulder joint. According to a research study by van Doorn et al, shoulder pain is the third most common musculoskeletal complaint treated in physical therapy. From my experience as a physical therapist, I have found that shoulder pain is often caused by repetitive activities. 


Common shoulder issues among archers and bowhunters include shoulder instability, scapular dyskinesis, rotator cuff disorders, biceps tendinopathy, bursitis, and shoulder impingement.


Shoulder instability

Occurs when the shoulder joint (glenohumeral joint) is unable to maintain its proper position due to excessive movement in the ligaments, joint capsule, or from insufficient dynamic stability of the rotator cuff musculature. This instability can result in frequent dislocations, subluxations, or allow excessive movement of the shoulder which causes undue stress and eventual pain, swelling, weakness, or limited range of motion. 


Scapular dyskinesis

Refers to abnormal movement or positioning of the shoulder blades (scapula) during shoulder movements and limits the efficiency of the complex shoulder joint. 


Rotator cuff disorders

Refers to a group of conditions that affect the muscles and tendons that attach the shoulder blade to the upper arm bone. The rotator cuff muscles include: supraspinatus, infraspinatus, teres minor, and subscapularis. These four muscles work to stabilize the shoulder joint and keep the ball and socket joint centered in optimal position. Rotator cuff disorders can include inflammation, tears, or degeneration resulting in pain and weakness. 


Biceps tendinopathy

Refers to pain and inflammation of the biceps tendon, which attaches the biceps muscle to the shoulder and elbow. This pain is usually located on the front of the shoulder and can cause a popping sensation in the shoulder. Biceps tendinopathy can be caused by overuse, degeneration, postural abnormalities, or poor shooting form and technique, and can result in pain, weakness, and limited mobility. 


Bursitis

Refers to inflammation of the small fluid-filled sacs that provide cushion between the tendons and bony structures. Bursitis can be caused by overuse or injury, and can result in pain and limited range of motion. 


Shoulder Impingement

Occurs when the tendons or bursa in the shoulder become compressed or pinched during shoulder movements, resulting in pain and limited mobility. It can be caused by a variety of factors, including overuse, poor posture, or structural abnormalities in the shoulder joint. 


It’s important to understand that the shoulder is a complex joint that involves many muscles, tendons, ligaments, and bones. If the riser and cam, or scapula and humerus, are not in the optimal position, then this may lead to bow failure or shoulder dysfunctions and pain. The aforementioned shoulder dysfunctions can occur separately, but oftentimes, they are interrelated and occur at the same time. 


For example, shoulder instability can lead to scapular dyskinesis because the shoulder blade has to compensate for the unstable joint. Scapular dyskinesis can then cause rotator cuff disorders because it changes the mechanics of how the rotator cuff muscles work. Rotator cuff disorders can also lead to biceps tendinopathy because the biceps tendon works closely with the rotator cuff muscles and, in my opinion, should be considered part of the rotator cuff for all practical purposes. Bursitis can develop as a result of any of these conditions because any abnormal movement or positioning of the shoulder can compress or pinch the tendons or bursae in the shoulder joint. 


This is a brief explanation of how complex the shoulder joint is and highlights the importance of addressing any shoulder pain as early as possible to prevent further dysfunction and pain while shooting a bow and arrow. 


By addressing the underlying dysfunction, archers and bowhunters can prevent the development or progression of other shoulder dysfunctions and minimize the risk of further damage or injury. 

Prevention and Management of Bow Arm Shoulder Pain 

Archers and bowhunters can prevent and treat bow arm shoulder pain with archery-specific exercises. Archery-specific exercises should include both compound and accessory exercises that target the rotator cuff, scapula, and arm musculature to help stabilize the shoulder and meet the demands of shooting a bow. 


Core strengthening, balance training, and mobility exercises are also vital in maximizing success and reducing risk of injury. 


Self-filming while shooting a bow and arrow will help identify shooting flaws and provide feedback on what may be contributing to your bow arm shoulder pain. 


Shooting a bow and arrow with poor archery form can compound shoulder problems and increase the risk of injury. 


To manage existing bow arm shoulder pain, modify shooting frequency, reduce draw weight, ice, modify shooting form and technique, or take a 1-2 week break from shooting. 

Step-by-Step Return to Shooting After a Shoulder Injury

1. Start with shorter distances: It’s important to start at a shorter distance, such as 10 yards, and gradually work your way up to longer distances. This will help you ease back into shooting and prevent re-injury.

2. Decrease the draw weight: Using a lighter draw weight can help reduce the strain on your shoulder as you work your way back up to shooting your normal draw weight. Increase the draw weight by no more than 5-10% in one week. 

3. Focus on form: When returning to shooting, it’s important to focus on your form and technique. This can help you prevent future injuries and improve your accuracy. I am a strong believer in self-filming to identify poor shooting form.

4. Incorporate stretching and warm-up exercises: Incorporating stretching and warm-up exercises into your routine can help improve your flexibility and reduce the risk of injury. 

5. Perform supplemental exercises: Progressive archery-specific exercises targeting the rotator cuff, scapula, and core musculature will help restore and build the strength necessary for performing archery and bowhunting at a high level. 

6. Listen to your body: It’s important to listen to your body and take breaks as needed. If you experience pain or discomfort when shooting, it may be a sign that you need to take a break or reduce the volume of your shooting. 

7. Seek professional guidance: If you’re unsure about how to safely return to shooting after a shoulder injury, it’s always a good idea to seek guidance from a healthcare professional or qualified archery coach. They can help you develop a safe and effective plan for returning to shooting.

Return to Archery Guide

Use this table as a guide to your recovery and return to shooting a bow and arrow. It’s important to note that these guidelines are just a starting point and may need to be adjusted based on individual recovery, physical ability, and experience with archery. Additionally, it’s important to always listen to your body and adjust accordingly. It may be a good idea to discuss your return to shooting with a healthcare professional. 

Return to archery table

Conclusion

Bow arm shoulder pain is a common issue among archers and bowhunters, but it can be prevented and managed with proper care. Understanding the causes of pain, recognizing symptoms, performing archery-specific exercises, and self-filming archery form are crucial steps to keep archers and bowhunters pain-free.

Check out our blog post on the 19 most common mistakes in archery form for additional tips on improving your shooting technique.

5 GREAT Tips for Improving Shoulder Pain After Archery

5 GREAT Tips for Improving Shoulder Pain After Archery

5 GREAT Tips for Improving Shoulder Pain After Archery

If you’re an archer or bowhunter dealing with shoulder pain, you don’t have to give up your passion – there are steps you can take to manage pain and enjoy your time in the field. As a physical therapist and avid hunter, I know that the shoulder joint is one of the most common body parts that can prevent us from shooting a bow or, in the worst case, keep us from the tree stand during the hunting season. 

In fact, a systematic review written by Lucas et al. found that a significant proportion of the world’s population will experience shoulder pain daily, yearly, and throughout a lifetime [1]. As a physical therapist, shoulder pain is one of the most common symptoms, behind low back and knee pain, that I see in the clinic on a daily basis.

Archers and bowhunters must be proactive at monitoring their aches and pains to stay ahead of their game. A seemingly minor injury can hang around, cause further dysfunction, and eventually ground us from the sport we love. The shoulder joint sacrifices stability for mobility, making it more susceptible to injury during archery or bowhunting compared to a more stable hip or knee joint.

Shoulder pain in bow hunters can be caused by: 

  • Poor and faulty shooting mechanics
  • Muscle imbalances
  • Repetitive/overuse injuries
  • A lack of mobility
  • Strength deficits
  • Irritated neural tissue from the neck
  • Improper bow set-up, i.e., draw length and weight.

There are hunters who have had to make the switch to a crossbow because of nagging shoulder pain and weakness. I don’t know about you, but shooting a compound or recurve bow is what makes a hunt so thrilling. The timing of the draw, the anchor, holding at full draw, and waiting for that buck to take one last step before you release the arrow is such an adrenaline rush. To make the situation more breathtaking is that this is all happening while trying to blend in with the vegetation 20 feet off the ground. Man, it gives me the chills writing this! Can you say buck fever?!

Moments like these are exactly why I created High Caliber Health. I guide hunters on their health and wellness journey so they can continue experiencing moments like these. I never want an injury or nagging pain to keep you from shooting a bow or taking a shot at your target buck.

Unfortunately, reducing shoulder pain is not a one-size-fits-all solution and can take time. Some people will respond entirely differently than others. What works for you may or may not work for your best friend or family member. 

As a physical therapist and certified strength and conditioning specialist, I strive to stay up-to-date with current literature to provide the best practices in helping my clients. In future blog posts, I will discuss shoulder mobility and strengthening exercises to help build archery-proof shoulders. Stay tuned! 

If you’ve stumbled upon this article, then you’re probably looking for some guidance. Let’s get to the good stuff!

The 5 BEST Tips to Improve Shoulder Pain for Bow Hunters:

1. Identify the underlying cause of pain 

As a physical therapist and certified strength and conditioning specialist, it’s essential to identify the underlying cause of your shoulder pain. This will allow you to effectively fix the issue and reduce pain, instead of chasing symptoms and running in circles. Don’t just treat your symptoms; ignoring the underlying issue can create a snowball effect and cause further issues down the road. 

The shoulder is made up of many moving parts, making it difficult to identify the exact cause of dysfunction and pain. My goal is to simplify the shoulder complex so that you can identify the issue and alleviate your own pain, allowing you to continue shooting a bow. 

When people talk about the shoulder, they often only think about the individual ball and socket joint, known as the glenohumeral joint, instead of considering the entire shoulder complex. It’s important to understand the basic anatomy of the shoulder and how it’s supposed to move to effectively address your pain. 

The shoulder complex is composed of four individual joints:

  1. Sternoclavicular joint
  2. Acromioclavicular joint
  3. Glenohumeral joint
  4. Scapulothoracic joint

All of these joints are connected by muscles, ligaments, tendons, and connective tissue. These joints must communicate and move in a coordinated manner, just like the parts of a bow. If one of these joints isn’t moving correctly, it will require another area to compensate, which can eventually cause dysfunction within the shoulder complex. 

In bowhunters, shoulder pain is often caused by a dysfunction with the scapulothoracic joint, specifically the shoulder blade (scapula) and surrounding musculature. It’s important to ensure that the scapula has adequate stability and mobility to create a solid foundation for the shoulder joint while drawing and shooting a bow. However, given the complexity of the shoulder complex – it’s essential to look at the big picture to identify the cause of dysfunction. 

Pro tip: Video yourself in slow motion while shooting a bow. This will allow you to critique your form and identify any shooting flaws that may contribute to shoulder pain.

2. Stretch before and after shooting

Warming up the body before any physical activity is generally a good idea to help reduce the risk of injury. Shooting a bow can be demanding on the body due to the repetitive nature of the sport. 

Start your target practice or hunt with a dynamic warm-up. A dynamic warm-up increases blood flow and activates the musculature required to shoot a bow. This will allow you to take advantage of the entire practice session, from the first to last arrow, and be prepared to draw on your target buck. 

Our muscles, joints, and nervous system perform at a much higher level following an adequate warm-up. Gradually increasing the range of motion and amplitude of movements throughout a warm-up will prepare the shoulder for the first shot on the range or the one shot from a tree stand. The quality of target practice is much greater after a dynamic warm-up rather than starting out cold. 

A dynamic warm-up before shooting a bow and arrow offers the following benefits:

  • Increases blood flow
  • Improves flexibility
  • Enhances focus and concentration
  • Boosts accuracy
  • Activates the muscles
  • Improves muscle function

After finishing your target practice or hunt, it’s recommended to cool down to minimize soreness. This can include performing light, static stretches for the muscles used during the activity. 

Pro tip: Throw a resistance band in your hunting bag to incorporate into your dynamic warm-up routine before a hunt or target practice. 

3. Maintain proper form and technique

Archery and bowhunting require repetitive shooting and practice for the greatest success. The shoulder joint is an incongruous, ball-and-socket joint that allows for considerable arm movement, which predisposes the joint to potential instability and, thus, shoulder pain. 

It is essential to adapt proper shooting form and technique to help minimize abnormal stress through the shoulder joint. Taking pictures or videos of your target practice can help you review your shooting form and identify any flaws.

Proper shooting technique can be achieved by:

  • Establishing a solid base of support
  • Placing feet shoulder-width apart for balance and stability
  • Keeping feet, hips, and shoulders stacked above one another
  • Drawing the bow with low shoulders
  • Drawing the bow with a high draw elbow, at the level of the nose or eyes
  • Having a relaxed grip on the bow handle
  • Anchoring the string in a consistent spot 
  • Anchoring the release hand in a consistent spot along the jaw or cheek
  • Relaxing and breathing during the draw, anchor, and release
  • Practicing a consistent release and follow through 

At full draw, an archer should be in a relaxed T position with both shoulder blades engaged “down and back” as they wait to release the arrow at their target. 

Pro-tip: Be aware of these common flaws in shooting form and technique so you don’t acquire a bad habit and increase your risk of injury. 

4. Exercise regularly

Newton’s first law of motion, “a body in motion will stay in motion,” holds true. Regular exercise maximizes the strength, stability, and range of motion necessary to perform hunting activities. 

When it comes to exercise, there is no wrong exercise. Find a program or routine that works for you and your schedule. Consistency is key – stick with the program for the best results. A good exercise program should include strength training, mobility training, and endurance training. Improving overall strength will help increase the draw weight and reduce the risk of injury when shooting a bow and arrow. 

Pro-tip: Track your daily protein intake for one week to determine whether or not you are meeting your daily recommendation. I’ve found that a majority of us do not consume enough protein. If this is the case, a protein supplement is recommended. 

5. Allow time for recovery

Passionate bow hunters and archers can shoot more than 100 arrows in a session. It may be advisable to allow one or two recovery days between high-volume sessions. Listen to your body and let the soreness guide the number of arrows you shoot in one session, as well as the frequency of practice sessions in a week.

This can be particularly important when returning to shooting a bow after the off-season. If you haven’t shot your bow since you tagged out last season, you may need more recovery time between sessions until your muscles are conditioned to handle the repetitive stress of shooting a bow.

Pro-tip: Spend rest days shed hunting, checking trail cameras, or cross-training.  

Summary

Shoulder pain is a common issue that all bowhunters and archers will face at some point in their life. By following these five tips, you will prioritize shoulder health and enjoy the sport with much less pain. 

Improving shoulder pain for bowhunters requires a multifaceted approach. Identifying the underlying cause of pain, practicing good form, stretching and strengthening exercises, and allowing recovery days can all help to alleviate shoulder pain and allow you to continue enjoying the sport of bow hunting. It can be very beneficial to work with a physical therapist or strength and conditioning specialist to develop a personalized plan to address your specific needs and goals. 

Source: Lucas, J., van Doorn, P., Hegedus, E. et al. A systematic review of the global prevalence and incidence of shoulder pain. BMC Musculoskelet Disord 23, 1073 (2022). https://doi.org/10.1186/s12891-022-05973-8

Achilles Tendonitis: Best Treatment to Fix Pain and Weakness

Achilles Tendonitis: Best Treatment to Fix Pain and Weakness

Achilles tendonitis is typically diagnosed when an individual experiences pain along the Achilles tendon. It’s important to note that inflammation may or may not be present with this condition. The underlying cause of Achilles tendonitis often lies in poor healing after small tears occur along the tendon, leading to stiffness and impaired mobility in the ankle and foot.

Can you feel a bulging disc with your hand?

Can you feel a bulging disc with your hand?

No, you cannot feel a bulging disc with your hand. The intervertebral discs are situated deep within the spine, positioned between adjacent vertebrae. Each disc is surrounded by layers of skin, fascia (connective tissue), muscles, and bony prominences of the spine (spinous processes). Even the most skilled hands cannot physically palpate deep enough to “feel” a bulging disc.